
Orchids are among the most elegant and rewarding houseplants you can grow. Their exotic flowers can bloom for weeks or even months, but maintaining those stunning blooms starts with healthy roots. One of the most important parts of orchid care is learning how to repot orchids correctly.
Unlike most houseplants, orchids don’t grow in regular potting soil. They need a light, airy growing medium that allows their roots to breathe. Over time, orchid bark breaks down, drainage decreases, and roots become overcrowded. When this happens, repotting orchids becomes essential to keep the plant healthy.
The good news is that repotting orchids isn’t difficult, even if you’ve never done it before. With the proper tools, fresh orchid potting mix, and a little patience, you can give your orchid a fresh start without damaging its delicate roots.
In this complete orchid repotting guide, you’ll learn:
- How to know when to repot orchids
- The best orchid potting mix to use
- How to remove and inspect orchid roots safely
- How to repot a Phalaenopsis orchid step by step
- Orchid care after repotting
- Common mistakes that kill orchids
- Expert tips for faster recovery and healthier blooms
Whether you own a Phalaenopsis orchid, Cattleya, Dendrobium, or another popular variety, this guide will help you repot your orchid with confidence.
Featured Snippet
To repot orchids, carefully remove the orchid from its old pot, gently remove the old bark mix, trim any dead or rotten roots with sterilized pruning shears, and place the plant into a slightly larger orchid pot filled with fresh orchid bark mix. Water lightly, keep the plant in bright indirect light, and avoid fertilizing for about two weeks while new roots establish.
Orchid Repotting at a Glance
| Category | Details |
| Project | Repotting an Orchid |
| Difficulty | Easy |
| Time Required | 20–40 Minutes |
| Skill Level | Beginner |
| Cost | $10–30 |
| Best Time | After flowering or when new roots appear |
| Recovery Time | 2–6 Weeks |
| Suitable For | Phalaenopsis and most indoor orchids |
Why Repotting Orchids Is Important
Many new orchid owners think orchids only need water and sunlight to thrive. However, the potting medium gradually decomposes over time, becoming compact and retaining excess moisture.
Without repotting, your orchid may experience:
- Poor drainage
- Root rot
- Slow growth
- Yellow leaves
- Wrinkled foliage
- Weak flowering
- Fungal diseases
- Root suffocation
Fresh orchid bark mix restores airflow around the roots, improves drainage, and gives the plant enough room to produce healthy new roots. Healthy roots are the foundation of strong leaves and beautiful blooms.
When Should You Repot Orchids?
Knowing when to repot orchids is just as important as knowing how.
Most indoor orchids should be repotted every 1–2 years, depending on how quickly the potting mix breaks down and how actively the roots are growing.
You should repot your orchid if you notice any of these signs:
Roots growing out of drainage holes ✔
Orchid roots circling the pot ✔
Potting mix breaking down into small pieces ✔
Water draining very slowly ✔
Bark remaining wet for several days ✔
Black, brown, or mushy roots ✔
Bad smell from the pot ✔
Orchid becoming unstable ✔
The plant has completely outgrown its container ✔
Best Time to Repot Orchids
The ideal time is:
- Immediately after flowering
- At the beginning of the growing season
- When fresh green root tips start emerging
- During spring or early summer for most species
Avoid repotting while your orchid is in full bloom unless there’s an emergency, such as severe root rot or pest infestation. Repotting during blooming can cause flowers to drop prematurely because the plant redirects its energy toward root recovery.
Choosing the Right Repotting Method
Different orchids need different approaches depending on their condition.
| Orchid Condition | Recommended Solution | Benefit |
| Bark mix breaking down | Replace potting mix | Better drainage and airflow |
| Root-bound orchid | Move to a pot 1–2 inches larger | Gives roots space to expand |
| Root rot | Remove damaged roots and replace the mix | Stops disease from spreading |
| Healthy orchid after blooming | Routine repotting | Encourages stronger future growth |
| Pot has poor drainage | Switch to an orchid pot with multiple drainage holes | Prevents excess moisture |
Choosing the Best Orchid Pot
Selecting the right orchid pot plays a major role in keeping roots healthy.
A common beginner mistake is choosing a pot that’s far too large.
Instead:
- Choose a pot only 1–2 inches larger than the current one.
- Ensure plenty of drainage holes.
- Use a clear plastic orchid pot whenever possible.
- Place the clear pot inside a decorative cachepot if desired.
- Never use a container without drainage.
Why Clear Orchid Pots Are Better
Clear pots make it easier to monitor:
- Root health
- Moisture levels
- Root growth
- Potting mix condition
- Early signs of root rot
They’re especially recommended for beginners learning orchid root care.
Things You’ll Need
| Item | Purpose |
| Fresh orchid bark mix | Proper airflow and drainage |
| Orchid pot | Supports healthy root growth |
| Sterilized pruning shears | Remove dead roots |
| Gloves | Protect hands and roots |
| Rubbing alcohol | Sterilize tools |
| Soft brush | Remove old bark |
| Spray bottle | Lightly moisten roots |
| Newspaper or tray | Keeps your workspace clean |
Best Orchid Potting Mix
One of the biggest mistakes beginners make is using regular potting soil.
Never plant orchids in standard potting soil.
Unlike typical houseplants, orchid roots need excellent airflow. Soil that stays wet for too long increases the risk of root rot.
A high-quality orchid potting mix usually contains:
- Fir bark
- Coconut husk chips
- Perlite
- Charcoal
- Lava rock (optional)
- Sphagnum moss (for dry climates)
A bark-based orchid mix works best for most indoor orchids, including Phalaenopsis orchids.
Safety Tips Before Repotting
Although repotting orchids is simple, taking a few precautions can prevent unnecessary damage.
Before you begin:
- Sterilize all pruning tools with rubbing alcohol.
- Wash your hands or wear clean gardening gloves.
- Handle orchid roots gently, as healthy roots can snap easily.
- Never force roots into a small pot.
- Work on a clean surface to reduce the risk of fungal or bacterial contamination.
- Always discard old potting mix instead of reusing it.
These small steps can greatly improve your orchid’s recovery after repotting.
Step-by-Step Guide: How to Repot Orchids Properly
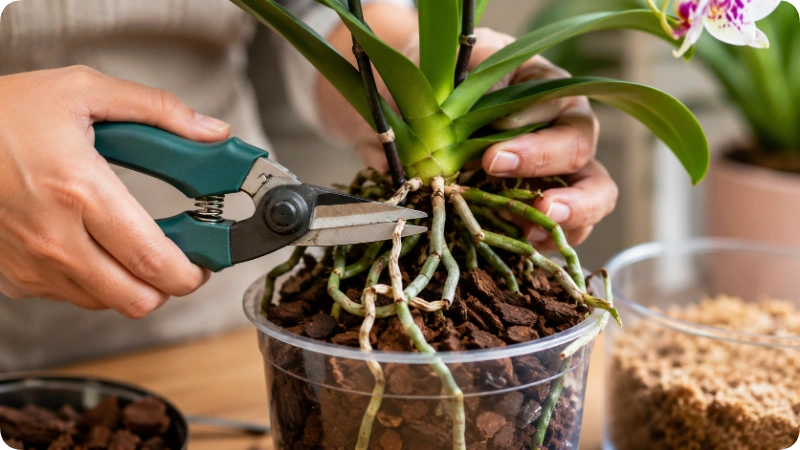
Now that you’ve prepared your workspace and gathered the right supplies, it’s time to repot your orchid. Follow these steps carefully to avoid damaging the roots and give your plant the best chance to recover quickly.
Step 1: Water Your Orchid One Day Before Repotting
Water your orchid 24 hours before repotting.
This simple step makes a big difference because hydrated roots become flexible instead of brittle.
Why this matters
Healthy orchid roots bend much more easily when hydrated, reducing the risk of snapping during repotting.
Avoid this mistake
Never repot an orchid with completely dry roots unless it’s an emergency. Dry roots are much more likely to break.
Step 2: Prepare Your Workspace
Having everything ready before removing the orchid makes the process much smoother.
Prepare:
- Fresh orchid bark mix
- Clean orchid pot
- Sterilized pruning shears
- Gloves
- Rubbing alcohol
- Newspaper or tray
- Spray bottle
Sterilize all cutting tools with rubbing alcohol before touching the roots.
Pro Tip
Keep a small trash bag nearby for old bark and dead roots to keep your workspace clean.
Step 3: Remove the Orchid from the Pot
Hold the orchid gently near the base where the leaves meet the roots.
If using a plastic pot:
- Squeeze the sides gently.
- Rotate the pot.
- Slowly pull the root ball free.
If roots stick to the pot:
- Loosen them carefully with your fingers.
- Never yank the plant out.
Why this matters
Healthy orchid roots absorb water and nutrients. Damaging too many roots can slow recovery and delay future flowering.
Step 4: Remove the Old Orchid Bark
Carefully remove as much old potting mix as possible.
Use:
- Your fingers
- A soft brush
- Gentle shaking
It’s perfectly fine if a few pieces remain attached.
Don’t do this
Avoid pulling aggressively because healthy roots tear very easily.
Step 5: Inspect the Orchid Roots
This is the most important step of the entire orchid repotting process.
Healthy orchid roots are usually:
- Thick
- Firm
- Green after watering
- Silvery-gray when dry
- Smooth and plump
Dead or unhealthy roots often appear:
- Brown
- Black
- Mushy
- Hollow
- Dry
- Papery
- Soft
Root Care Tip
Don’t remove roots simply because they’re outside the pot. Healthy aerial roots help orchids absorb moisture from the air.
Step 6: Trim Dead or Rotten Roots
Using sterilized pruning shears, remove only unhealthy roots.
Cut:
- Rotten roots
- Mushy roots
- Hollow roots
- Completely dried roots
Leave:
- Firm green roots
- Silvery roots
- Thick healthy roots
Trim back until healthy tissue is visible.
Why this matters
Removing damaged roots helps prevent fungal diseases and encourages fresh root growth.
Beginner Tip
If you’re unsure whether a root is alive, leave it. Healthy roots are far more valuable than accidentally removing them.
Step 7: Choose the Right Pot
Before filling the pot, place the orchid inside to check the fit.
Your orchid should:
- Sit comfortably
- Have room for new roots
- Not be buried too deeply
The crown (where leaves meet roots) should remain slightly above the potting mix.
Best Pot Size
Choose a pot only 1–2 inches larger than the previous one.
A pot that’s too large holds excess moisture, increasing the risk of root rot.
Step 8: Add Fresh Orchid Potting Mix
Add a small layer of fresh bark mix to the bottom of the pot.
Position the orchid in the center.
Gradually fill around the roots with fresh orchid bark.
Gently tap the pot several times to allow the bark pieces to settle naturally.
Do not press the bark down tightly.
Why Loose Bark Matters
Unlike regular houseplants, orchids need oxygen around their roots.
Loose bark:
- Improves airflow
- Prevents root rot
- Drains water quickly
- Supports healthier root development
Common Mistake
Packing bark tightly like garden soil suffocates orchid roots.
Step 9: Secure the Orchid
Fresh bark doesn’t always hold the plant firmly.
If your orchid feels unstable:
- Insert an orchid stake.
- Use orchid clips if needed.
- Tie the stem loosely.
Leave the support in place until new roots anchor themselves.
Most orchids stabilize within several weeks.
Step 10: Water After Repotting
Many beginners ask:
Should orchids be watered immediately after repotting?
The answer depends on the roots.
If most roots were healthy:
Water lightly after repotting.
This helps settle the bark around the roots.
If many roots were trimmed:
Wait approximately 24 hours before watering.
This allows cut surfaces to dry, reducing the risk of infection.
After that:
Water thoroughly until excess water drains from the bottom.
Never leave your orchid sitting in water.
Step 11: Move the Orchid to the Right Location
Freshly repotted orchids recover best under gentle conditions.
Choose a location with:
- Bright indirect sunlight
- Good air circulation
- Moderate humidity
- Temperatures between 65°F–80°F (18–27°C)
Avoid:
- Direct afternoon sunlight
- Heating vents
- Cold drafts
- Air conditioners
- Constant movement
Recovery Tip
Try not to move your orchid around during the first few weeks.
Keeping conditions stable helps reduce transplant stress.
Step 12: Wait Before Fertilizing
Fresh roots are sensitive.
Applying fertilizer immediately after repotting can burn damaged root tips.
Instead:
- Wait about two weeks.
- Use a balanced orchid fertilizer.
- Apply at half the recommended strength.
- Water first before fertilizing.
Following this schedule helps encourage healthy new root development without overwhelming the plant.
How to Know Your Orchid Was Repotted Correctly
During the first several weeks, look for these positive signs:
Leaves remain firm✅
Plant stands upright✅
Water drains quickly✅
Roots stay green after watering✅
New root tips appear✅
Fresh leaves begin growing✅
Remember, flowers may not appear immediately. Your orchid focuses on rebuilding its root system before producing new blooms.
Recovery Timeline
| Time After Repotting | What You Can Expect |
| First 24 Hours | Orchid adjusts to its new environment |
| First Week | Little visible change while roots recover |
| 2–4 Weeks | New green root tips may begin appearing |
| 1–3 Months | Stronger root system develops |
| Next Blooming Season | Healthier flowers and longer-lasting blooms |
Every orchid grows at its own pace, so don’t worry if recovery takes a little longer. Strong roots are the first sign that your repotting was successful.
Orchid Care After Repotting, Common Mistakes, Troubleshooting & Expert Tips
Repotting is only half the job. The way you care for your orchid during the next few weeks determines how quickly it develops new roots and returns to healthy growth. Fortunately, with the right aftercare, most orchids recover well and reward you with stronger foliage and beautiful blooms.
Orchid Care After Repotting
A freshly repotted orchid is adjusting to a new environment. During this recovery period, avoid making sudden changes to its care routine.
1. Provide Bright, Indirect Light
Place your orchid where it receives plenty of bright, filtered sunlight.
Good locations include:
- East-facing windows
- North-facing windows
- South or west windows with sheer curtains
Avoid direct afternoon sun, which can scorch leaves and stress the recovering roots.
Signs Your Orchid Has the Right Light
Bright green leaves✅
Steady root growth✅
Healthy new leaves✅
Signs of Too Much Light
- Yellow leaves
- Sunburn spots
- Bleached foliage
2. Water Carefully
The biggest mistake after repotting orchids is overwatering.
Instead of watering on a fixed schedule:
- Check the bark mix regularly.
- Water only when the potting mix is nearly dry.
- Ensure excess water drains completely.
A clear orchid pot makes it easier to monitor moisture levels and root color.
Watering Tip
Healthy orchid roots look:
- Green after watering
- Silver-gray when dry
If the roots remain green for several days, wait longer before watering again.
3. Maintain Proper Humidity
Most indoor orchids thrive with 40–70% humidity.
If your home is dry, try:
- A humidity tray
- A room humidifier
- Grouping plants together
Avoid misting the crown of the orchid, as standing water can encourage crown rot.
4. Resume Fertilizing Slowly
Wait about two weeks after repotting before feeding your orchid.
Use:
- Balanced orchid fertilizer
- Half-strength solution
- Once every two to four weeks during active growth
Overfertilizing too soon can damage sensitive new roots.
5. Avoid Moving the Plant Frequently
Once you’ve placed your orchid in a suitable location, leave it there.
Constant movement changes:
- Temperature
- Humidity
- Light exposure
Stable conditions help orchids recover faster.
Alternative Orchid Growing Methods
While bark-based potting is the most common approach, experienced growers sometimes use alternative methods.
Repotting Into a Clear Plastic Orchid Pot
Clear plastic pots are highly recommended because they allow you to monitor:
- Root health
- Moisture levels
- Root growth
- Drainage
This is the best option for beginners learning orchid care.
Mounting Orchids
Some orchid species naturally grow attached to trees.
Instead of using a traditional pot, they can be mounted on:
- Cork bark
- Hardwood
- Tree fern panels
Mounted orchids receive excellent airflow but require:
- More frequent watering
- Higher humidity
- Regular monitoring
Semi-Hydroponic Growing
Some orchid growers replace bark with LECA (Lightweight Expanded Clay Aggregate).
Benefits include:
- Consistent moisture
- Excellent airflow
- Cleaner growing medium
However, semi-hydroponic systems require different watering routines and are generally better suited for experienced orchid growers.
Common Mistakes to Avoid
Even experienced gardeners occasionally make mistakes. Avoiding these common errors can dramatically improve your orchid’s recovery.
Using Regular Potting Soil
Standard potting soil retains too much moisture and restricts airflow.
Always use a dedicated orchid bark mix.
Choosing a Pot That’s Too Large
A large pot may seem to give roots more room, but it actually retains excess moisture.
Always choose a pot only 1–2 inches larger than the current one.
Packing the Bark Too Firmly
Unlike soil, orchid bark should remain loose.
Compressed bark reduces airflow and increases the risk of root rot.
Cutting Healthy Roots
Only remove roots that are:
- Black
- Brown
- Mushy
- Hollow
Healthy green or silver roots should remain intact.
Watering Too Frequently
Newly repotted orchids absorb water more slowly.
Too much water is one of the leading causes of root rot.
Fertilizing Immediately
Freshly disturbed roots are extremely sensitive.
Wait about two weeks before feeding.
Repotting During Full Bloom
Unless your orchid has severe root rot or disease, wait until flowering finishes.
Repotting during blooming often causes flowers to drop early.
Reusing Old Bark
Old bark:
- Holds excess moisture
- Contains fungi and bacteria
- Breaks down over time
Always replace it with fresh orchid potting mix.
Forgetting to Sterilize Pruning Tools
Dirty tools can spread:
- Bacteria
- Viruses
- Fungal diseases
Always disinfect scissors before trimming roots.
Troubleshooting Common Orchid Problems
| Problem | Likely Cause | Solution |
| Wrinkled leaves | Root stress or dehydration | Check roots and water properly |
| Orchid feels loose | Roots haven’t attached yet | Use a stake for support |
| Black roots | Overwatering or poor drainage | Replace wet bark and reduce watering |
| Bark stays wet for days | Poor airflow | Switch to a better-draining bark mix |
| Yellow leaves | Natural aging or watering issues | Inspect roots before adjusting care |
| Orchid won’t bloom | Recovery period or insufficient light | Provide patience and brighter indirect light |
| Mushy crown | Crown rot | Keep water away from the crown and improve airflow |
| Slow root growth | Cool temperatures or low humidity | Increase warmth and humidity gradually |
Expert Tips for Successful Orchid Repotting
Professional orchid growers follow a few simple habits that make a big difference over time.
Repot After Flowering
Your orchid experiences less stress when flowers have finished blooming.
Watch the Roots, Not Just the Leaves
Healthy roots are the best indicator of your orchid’s overall health.
Inspect them regularly through clear orchid pots.
Label the Repotting Date
Write the repotting date on the pot.
This helps you remember when the bark may need replacing again in one to two years.
Replace Bark Before It Breaks Down Completely
Don’t wait until the bark turns into fine particles.
Fresh bark keeps roots healthier for longer.
Water Based on the Potting Mix
Avoid watering on a fixed weekly schedule.
Instead, check:
- Bark moisture
- Root color
- Pot weight
These provide much better indicators.
Increase Humidity Instead of Watering More
If leaves appear slightly dehydrated but the bark remains wet, increasing humidity is often a better solution than adding more water.
Rotate Your Orchid Occasionally
Rotate the pot every few weeks for balanced growth.
However, avoid frequent movement during the recovery period immediately after repotting.
When to Call a Professional
Although most orchids recover well at home, some situations require expert assistance.
Seek professional help if:
- More than 75% of the root system has rotted.
- The crown is soft or black.
- The orchid has a severe bacterial or fungal infection.
- The plant continues declining several weeks after repotting despite proper care.
- You own a rare or expensive orchid with specialized growing requirements.
Early intervention can sometimes save orchids that appear beyond recovery.
What to Do Next
Now that you’ve successfully repotted your orchid:
- Monitor moisture levels carefully.
- Keep the plant in bright, indirect light.
- Wait two weeks before fertilizing.
- Watch for new root tips and leaf growth.
- Water only when the bark mix begins to dry.
- Inspect the potting mix every year and plan to repot again every one to two years.
Healthy roots lead to healthier leaves, stronger growth, and longer-lasting flowers. With proper care, your orchid can continue thriving and blooming beautifully for many years.
Frequently Asked Questions
1. How often should orchids be repotted?
Most orchids should be repotted every one to two years, or sooner if the potting mix starts breaking down, the roots become overcrowded, or you notice signs of root rot. Regular repotting keeps the root system healthy and improves drainage.
2. What is the best potting mix for orchids?
The best orchid potting mix is a loose, fast-draining blend that allows plenty of air to reach the roots. Most beginners achieve excellent results with a bark-based mix containing:
- Fir bark
- Coconut husk chips
- Perlite
- Charcoal
- Sphagnum moss (optional for dry climates)
Avoid using regular potting soil because it retains too much moisture.
3. Can I repot an orchid while it is blooming?
It’s generally best to wait until flowering has finished before repotting orchids. Repotting during bloom can stress the plant and cause flowers to drop early.
However, if your orchid has severe root rot, pests, or decomposed potting mix, repotting immediately may be necessary to save the plant.
4. Should I water my orchid immediately after repotting?
It depends on the condition of the roots.
- Healthy roots: Water lightly after repotting.
- Many roots trimmed: Wait about 24 hours before watering to reduce the risk of infection.
Afterward, water thoroughly and let excess water drain away.
5. Can orchids grow in regular potting soil?
No. Orchids should never be planted in standard potting soil because it holds too much moisture and restricts airflow around the roots.
Instead, use a high-quality orchid bark mix specifically designed for epiphytic orchids.
6. How do I know if my orchid roots are healthy?
Healthy orchid roots are usually:
- Firm
- Thick
- Green when wet
- Silvery-gray when dry
Unhealthy roots are often:
- Brown
- Black
- Mushy
- Hollow
- Dry and papery
Inspecting the roots regularly is one of the best ways to monitor your orchid’s health.
7. Why are my orchid leaves wrinkled after repotting?
Wrinkled leaves often indicate temporary root stress or watering issues after repotting.
Check the roots, water appropriately, and allow the plant time to recover. New root growth usually improves leaf hydration over the following weeks.
8. What size pot is best for orchids?
Choose a pot that is only 1–2 inches larger than the current one.
Oversized pots retain excess moisture, increasing the risk of root rot. A clear plastic orchid pot with plenty of drainage holes is ideal for most indoor orchids.
9. How long does it take an orchid to recover after repotting?
Most orchids begin producing new roots within 2–4 weeks, while complete root establishment may take 1–3 months depending on the species, season, and overall health of the plant.
10. Should aerial orchid roots be buried?
No. Healthy aerial roots should remain outside the pot if they naturally grow that way.
Never force aerial roots into the potting mix, as this can damage them.
Final Thoughts
Learning how to repot orchids is one of the most valuable skills any orchid owner can develop. Fresh potting mix, a properly sized orchid pot, and gentle root care create the ideal environment for healthy growth and spectacular blooms.
Although repotting may seem intimidating at first, it becomes much easier with practice. The key is to work slowly, handle the roots carefully, and avoid common mistakes like overwatering or using regular potting soil.
Once your orchid settles into its new home, you’ll likely notice healthier roots, stronger leaves, and more vibrant flowers during the next blooming season.
With proper orchid care after repotting, your plant can thrive for many years and continue producing beautiful blooms that brighten your home.
