
A hand-tied bouquet turns loose stems into a single, balanced arrangement you can give as a gift, display in a vase, or carry down an aisle. The task is simple in concept: group flowers, secure them, trim them, but most first attempts come out lopsided, with flowers bunched on one side and stems that won’t sit straight in a vase. That happens because of the order the steps are done in, not because of a lack of skill.
This guide is for anyone assembling a bouquet by hand at home, using grocery-store or garden flowers, with no floral foam or wire required. By the end, you’ll have a bouquet that holds its shape, stands upright in a vase, and stays fresh for closer to a week than a day or two.
Featured Snippet
To make a bouquet, strip lower leaves from each stem, then build it by adding flowers one at a time while spiraling the stems in the same direction in your hand. Secure the bundle with floral tape or twine, trim the stems to an even length at an angle, and place the bouquet in fresh water immediately.
Before You Begin
Difficulty: Easy to moderate. The spiral technique takes a few tries to feel natural. Time: 20–40 minutes for a bouquet of 12–20 stems. Cost: $15–$60 depending on flower type and quantity, or free if using garden-cut flowers. DIY vs. buying pre-made: Doing it yourself costs less and lets you control color, size, and freshness, but a florist will produce a more uniform result faster if you’re short on time or the occasion is formal (weddings, funerals). Prerequisites: Fresh-cut flowers, a clean work surface, and floral shears or sharp scissors. No prior floral experience needed.
Choosing the Right Approach
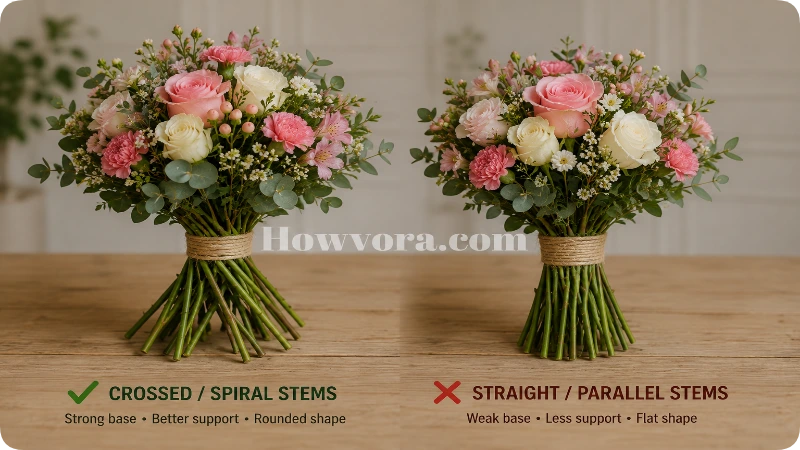
There are two common ways to hand-build a bouquet. Which one to use depends mostly on the number of stems and how symmetrical you want the final shape to be.
| Method | Best For | Difficulty | Result |
| Spiral technique (stems cross at a consistent angle in one direction) | Bouquets of 10+ stems; round, full shapes | Moderate | Stems fan out evenly at the base, so the bouquet stands on its own and looks full from every angle |
| Straight-bunch technique (stems held parallel, no crossing) | Small, casual bouquets of 5–10 stems | Easy | Faster to assemble, but the bouquet tends to look flatter and lean to one side if not held carefully |
Most competing guides only describe the spiral technique and skip why it matters: the spiral isn’t decorative; it’s what lets the bouquet stand upright on a flat surface without a vase, because the crossed stems form a self-supporting base. If you’re short on flowers or time, the straight-bunch method is a legitimate shortcut, not a lesser version.
At a Glance
| Category | Details |
| Difficulty | Easy to moderate |
| Time required | 20–40 minutes |
| Cost | $15–$60 (or free with garden flowers) |
| Skill level | Beginner-friendly |
| Best for | Gifts, home display, casual events |
Things You’ll Need
| Item | Purpose |
| Fresh-cut flowers (focal, filler, and greenery) | The three types create depth instead of a flat, one-note look |
| Floral shears or sharp scissors | Clean cuts prevent crushed stems, which block water uptake |
| Floral tape, twine, or a rubber band | Secures the spiral so stems don’t shift while you keep adding flowers |
| Ribbon (optional) | Covers the tie point for a finished look |
| A clean vase or container | Holds the finished bouquet in water |
| Flower food packet (optional, often included with store flowers) | Extends vase life by a few extra days |
Step-by-Step Guide
- Condition the flowers first. Unwrap all stems and remove any leaves that would sit below the waterline once arranged. Submerged leaves rot and cloud the water, which shortens the life of every stem in the bouquet, not just the affected one.
- Sort flowers by type. Separate focal flowers (the largest, most eye-catching blooms: roses, peonies, sunflowers), filler flowers (smaller blooms that fill gaps: baby’s breath, statice), and greenery (foliage that adds structure: eucalyptus, fern).
- Choose your first stem. Hold it upright in your non-dominant hand, about a third of the way up from the base, as your center point.
- Add stems one at a time, rotating. Place the next stem at a slight diagonal against the first, then rotate the growing bundle a quarter-turn before adding the next one. Keep the diagonal angle and rotation direction consistent; this is what creates the spiral. Alternate focal flowers, filler, and greenery as you go rather than grouping all of one type, which is the most common cause of a lopsided bouquet.
- Check the shape from above periodically. Look down at the top of the bundle every few stems. It should be building into a rounded dome, not a flat fan. Adjust by adding stems to any thin side before continuing.
- Secure the bundle. Once all stems are in, wrap floral tape, twine, or a rubber band tightly around the point where the stems cross, usually a third to halfway down. This is the “hand” of the bouquet; everything above it should already look finished.
- Trim the stems evenly. Hold the bouquet upright and cut all stems at the same angled length, about 1–2 inches longer than needed for your vase. A single clean cut across the group, rather than cutting each stem separately beforehand, is what keeps the base level.
- Add ribbon (optional). Wrap ribbon over the tie point to hide the tape or twine, then finish with a knot or bow.
- Place in water immediately. Set the bouquet in a vase with fresh water, and add flower food if you have it. Flowers left dry for more than a few minutes start to wilt at the cut ends, which slows how well they rehydrate afterward.
How to Know You Did It Correctly
The bouquet should stand upright on its own if you set it stem-down on a flat surface; the spiraled stems act as a tripod. From above, the flowers should form a rounded, even dome with no bare gaps or one-sided clumping. The tie point should feel secure enough that you can lift the bouquet by the stems without it shifting apart.
Expected Timeline and Results
A well-assembled bouquet in fresh water typically looks its best for 3–5 days and remains presentable for up to a week, depending on flower type. Roses and carnations tend to last longer than tulips or hydrangeas. Expect some petal drop and color fading starting around day 4–6; this is a normal aging process, not a sign the bouquet was made incorrectly.
Alternative Methods
Using floral foam: Instead of hand-tying, stems can be cut short and inserted directly into water-soaked floral foam inside a container. This gives more control over precise placement and is common for centerpieces, but it produces an arrangement rather than a portable, huggable bouquet.
Using a vase as a guide: For a low-effort option, add flowers directly into a vase one at a time, turning the vase as you go instead of building the spiral in-hand. The result is looser and less structured but works well for casual, everyday arrangements.
Common Mistakes to Avoid
- Skipping stem conditioning. Leaves left below the waterline rot and shorten the life of the whole bouquet.
- Grouping same-type flowers instead of alternating. This is the single biggest cause of a lopsided or clumpy-looking bouquet.
- Cutting stems before securing the bundle. Trimming individually first makes it nearly impossible to get an even base later; always tie first, then cut as one group.
- Using dull scissors. Crushed stem ends restrict water uptake even if the flower looks fine at first.
- Letting flowers sit dry too long during assembly. Work in short sessions and keep unused stems in water until you’re ready for them.
Troubleshooting & Common Problems
| Problem | Cause | Solution |
| Bouquet leans to one side | Flowers added in clumps by type instead of rotated evenly | Rebuild by loosening the tie and redistributing stems, alternating types as you re-spiral |
| Bouquet won’t stand upright | Stems held parallel instead of spiraled | Re-tie using the spiral technique so stems cross and form a stable base |
| Flowers wilting within a day | Leaves left below the waterline, or stems not conditioned | Re-cut stems at an angle, remove submerged leaves, and change the water |
| Tie point keeps loosening | Tape or twine wrapped too loosely, or wrapped only once | Wrap twice around the tie point and knot securely, or use floral tape, which self-adheres |
| Bouquet looks sparse or gappy | Not enough filler flowers or greenery relative to focal flowers | Add 2–3 more filler stems into the thin areas before final trimming |
Expert Tips
- Cut stems underwater or immediately transfer them to water after cutting; air bubbles that enter a freshly cut stem can block water uptake for the rest of its vase life.
- Re-cut all stems every 2–3 days during the bouquet’s display life to keep water uptake efficient; this alone can add a day or two of freshness.
- Keep the finished bouquet away from direct sunlight, heating vents, and ripening fruit; fruit releases ethylene gas, which speeds up wilting in cut flowers.
- If a bouquet is being transported or given as a gift, wrap the stem base in a damp paper towel and plastic wrap to keep it hydrated for a few hours out of water.
What to Do Next
Once your bouquet is assembled, trim the stems again right before placing it in its final vase, and change the water every 2 days to keep it fresh as long as possible. If you’re making bouquets regularly, keep a pair of dedicated floral shears; they make cleaner cuts than household scissors and stay sharper longer.
FAQs
How many flowers do I need for a full bouquet?
Most hand-tied bouquets use 12–20 stems, mixing focal flowers, filler, and greenery. Fewer than 10 stems will look sparse unless you’re going for a minimalist style.
Can I mix different flower types in one bouquet?
Yes, mixing focal flowers, filler, and greenery is what gives a bouquet depth and texture. Using only one flower type produces a flatter, less dynamic look.
Do I need floral foam to make a bouquet?
No. Hand-tied bouquets don’t require floral foam; it’s only needed for arrangements placed directly into a fixed container, like a centerpiece.
Why does my bouquet keep falling apart?
This usually means the tie point wasn’t wrapped tightly enough, or the stems weren’t crossed in a spiral, so nothing is holding the bundle’s shape structurally.
How long will a homemade bouquet last?
Typically 3–5 days looking fresh, up to a week overall, depending on flower type, water changes, and whether stems are re-cut periodically.
Can I make a bouquet without ribbon?
Yes. Ribbon is purely decorative to cover the tie point; floral tape or twine alone is enough to hold the bouquet together.
What flowers last the longest in a bouquet?
Carnations, chrysanthemums, and alstroemeria tend to hold up longer than more delicate blooms like tulips, hydrangeas, or peonies.
Final Thoughts
A bouquet comes together through order of operations more than raw skill: condition the flowers first, alternate types as you build, spiral the stems for structure, and cut once as a group at the end. Once that sequence becomes automatic, the rest is just choosing flowers you like.
Image Prompts
Feature image: A hand-tied bouquet of mixed roses, filler flowers, and greenery resting on a wooden table in soft natural light, tied with twine at the stem base. Watermark: “Howvora.com”
Image for “Choosing the Right Approach”: Two side-by-side bouquets, one with crossed spiral stems and one with straight parallel stems, showing the difference in base structure. Watermark: “Howvora.com”
Image for “Step-by-Step Guide”: Close-up of hands holding a partially assembled bouquet mid-spiral, rotating a new stem into the bundle. Watermark: “Howvora.com”
Meta Description: “Learn how to make a bouquet of flowers that stands on its own and stays fresh longer, with a step-by-step spiral technique anyone can follow.” (152 characters)
