
Nothing beats a perfectly grilled burger with a juicy center, flavorful crust, and toasted bun. While grilling burgers sounds simple, many people end up with dry patties, uneven cooking, flare-ups, or burgers that fall apart.
This guide explains exactly how to grill burgers on a gas grill, If you’re cooking for a family dinner or a backyard barbecue. You’ll learn how to choose the right beef, prepare patties correctly, control grill temperatures, avoid common mistakes, and know precisely when your burgers are done.
By the end, you’ll be able to grill restaurant-quality burgers with confidence consistently.
Featured Snippet
To grill burgers on a gas grill, preheat the grill to medium-high heat (about 400–450°F), clean and oil the grates, cook the burgers for 3–5 minutes per side depending on thickness and desired doneness, flip only once, and use a meat thermometer to verify the internal temperature. Let the burgers rest for a few minutes before serving.
Before You Begin
Grilling burgers successfully starts long before they hit the grill. Choosing quality ingredients and preparing your grill properly makes a noticeable difference in both flavor and texture.
| Category | Details |
| Difficulty | Easy |
| Total Time | 20–30 minutes |
| Active Cooking Time | 8–12 minutes |
| Estimated Cost | $10–$30 depending on ingredients |
| Skill Level | Beginner to Intermediate |
| Best For | Backyard BBQs, family dinners, cookouts, parties |
| DIY or Professional | DIY |
Prerequisites
Before lighting the grill, make sure you have:
- A clean gas grill
- Fresh ground beef
- Reliable meat thermometer
- Metal spatula
- Long-handled grill tongs
- Burger buns and toppings ready
Having everything prepared beforehand prevents overcooking while searching for ingredients.
Choosing the Right Approach
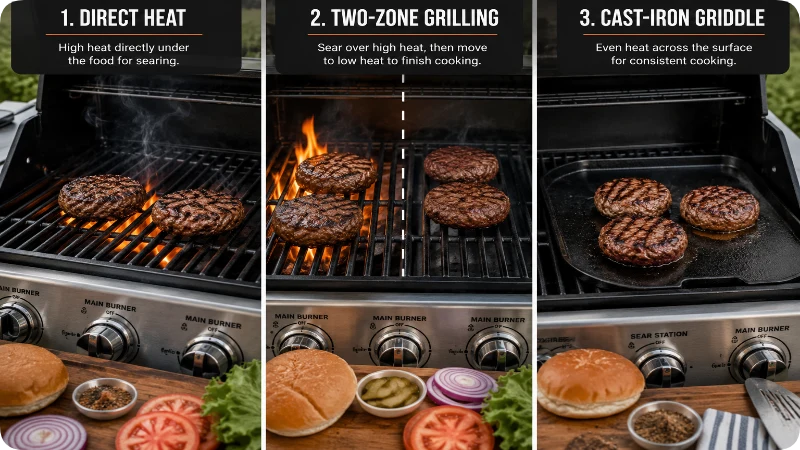
Not every burger is grilled the same way. Your preferred burger style determines how thick the patties should be, how long they’ll cook, and the ideal grilling temperature.
| Method | Best For | Pros | Cons |
| Medium-High Heat (400–450°F) | Most burgers | Even cooking, juicy interior, great crust | Requires attention to timing |
| High Heat (450–500°F) | Thin burgers | Quick cooking and crisp exterior | Easier to overcook |
| Two-Zone Grilling | Thick burgers | Better temperature control and fewer flare-ups | Requires more grill setup |
Which Method Is Best?
For most home cooks, medium-high direct heat offers the best balance of browning, juiciness, and control.
If you’re cooking burgers thicker than 1 inch, use a two-zone setup. Start over direct heat for a nice sear, then move them to indirect heat to finish cooking without burning the outside.
This simple adjustment is often overlooked but produces much more consistent results.
At a Glance
| Factor | Recommendation |
| Grill Temperature | 400–450°F |
| Patty Thickness | ¾–1 inch |
| Cooking Time | 8–12 minutes total |
| Flip Frequency | Once |
| Rest Time | 3–5 minutes |
| Ideal Beef | 80/20 ground chuck |
| Thermometer | Highly recommended |
Things You’ll Need
| Item | Purpose |
| Ground beef (80/20) | Juicy burgers |
| Gas grill | Cooking |
| Meat thermometer | Accurate doneness |
| Grill brush | Cleaning grates |
| Cooking oil | Prevent sticking |
| Paper towels | Oiling grill grates |
| Metal spatula | Flipping burgers |
| Tongs | Moving buns and toppings |
| Burger buns | Serving |
| Cheese (optional) | Cheeseburgers |
| Seasonings | Flavor |
| Aluminum tray | Resting burgers |
Safety Precautions
Although grilling burgers is straightforward, working around high heat and raw meat requires a few important precautions.
Wash Hands Thoroughly
Always wash your hands before and after handling raw ground beef to avoid cross-contamination.
Keep Raw and Cooked Foods Separate
Use separate plates and utensils for raw patties and cooked burgers. Never place cooked burgers back onto the plate that held raw meat.
Watch for Flare-Ups
Fat dripping onto the burners can create sudden flames. If flare-ups occur:
- Move burgers temporarily to indirect heat.
- Close the grill lid briefly.
- Avoid spraying water onto the flames.
Use a Meat Thermometer
Ground beef should reach a safe internal temperature before serving. A thermometer removes guesswork and helps prevent both undercooking and overcooking.
Handle the Grill Carefully
- Wear heat-resistant grilling gloves if needed.
- Keep children and pets away from the hot grill.
- Never leave a lit gas grill unattended.
Step-by-Step Guide
Step 1: Choose the Right Ground Beef
The quality of your burger starts with the beef. For the juiciest results, choose 80/20 ground chuck, which contains about 80% lean meat and 20% fat.
The fat is essential because it melts during cooking, keeping the burger moist and flavorful. Leaner blends such as 90/10 or 93/7 can work, but they tend to produce drier burgers unless cooked very carefully.
If buying from a butcher, ask for freshly ground chuck whenever possible.
Why it matters: Fat equals flavor and juiciness.
Common mistake: Choosing extra-lean beef and expecting a juicy burger.
Step 2: Form the Patties Properly
Divide the beef into equal portions.
A typical burger uses about:
- ¼ pound (4 ounces) for standard burgers
- ⅓ pound (5–6 ounces) for larger burgers
Handle the meat gently. Compressing it too much creates a dense, tough burger.
Shape each patty about ¾ to 1 inch thick, making the edges slightly thicker than the center.
Using your thumb, press a shallow indentation into the center of each patty.
This simple trick helps prevent the burgers from puffing into a dome while grilling.
Avoid mixing breadcrumbs, eggs, or fillers into burgers unless you’re intentionally making hamburger steaks.
Why it matters: Properly shaped patties cook evenly and stay flatter on the grill.
Common mistake: Packing the meat tightly or skipping the center indentation.
Step 3: Season Just Before Grilling
Keep seasoning simple.
Generously sprinkle both sides of each patty with:
- Kosher salt
- Freshly ground black pepper
You can also add:
- Garlic powder
- Onion powder
- Smoked paprika
- Steak seasoning
Season the burgers immediately before placing them on the grill.
Salting too early draws moisture out of the meat, resulting in a drier burger.
Why it matters: Fresh seasoning enhances flavor without changing the burger’s texture.
Common mistake: Mixing salt into the beef long before grilling.
Step 4: Preheat the Gas Grill Correctly
Turn all burners to high and close the lid.
Allow the grill to preheat for 10–15 minutes.
Your target cooking temperature should be approximately:
400–450°F (medium-high heat)
A properly preheated grill provides:
- Better searing
- More even cooking
- Cleaner grill marks
- Less sticking
If your grill has hot spots, take note of them now. They can be useful later if you need extra heat or a cooler area.
Clean the Grill Grates
After preheating, scrub the grates using a grill brush.
Removing old residue prevents sticking and improves flavor.
Oil the Grates
Lightly coat folded paper towels with a high-smoke-point oil such as:
- Canola oil
- Avocado oil
- Vegetable oil
Using long tongs, wipe the hot grates with the oiled towel.
Do not pour oil directly onto the grill.
Why it matters: Clean, lightly oiled grates help burgers release easily without tearing.
Common mistake: Placing burgers on dirty or cold grates.
Step 5: Place the Burgers on the Grill
Arrange the patties over direct heat, leaving at least 1–2 inches between each burger.
Spacing allows hot air to circulate evenly around each patty.
Close the lid after placing the burgers on the grill.
The closed lid traps heat, cooking the burgers more evenly while creating better browning.
Avoid pressing the burgers with your spatula.
Although many people do this, pressing forces flavorful juices into the flames instead of keeping them inside the meat.
Resist the temptation to move the burgers around during the first few minutes.
Once a crust forms, they’ll naturally release from the grates.
Why it matters: Minimal movement creates a better sear and locks in moisture.
Common mistake: Constantly moving or flattening the burgers.
Step 6: Flip the Burgers Only Once
One of the biggest myths about grilling burgers is that frequent flipping makes them cook better. In reality, allowing the burger to cook undisturbed helps develop a flavorful, caramelized crust.
After about 3–5 minutes, check underneath one burger with a metal spatula. If it releases easily and has a rich brown crust, it’s ready to flip.
Turn each burger over only once.
After flipping, close the grill lid again to maintain consistent heat.
Why it matters: A single flip allows both sides to brown properly while keeping the burger juicy.
Common mistake: Flipping every minute or trying to turn the burger before it naturally releases from the grates.
Step 7: Monitor the Internal Temperature
Cooking by time alone isn’t always reliable because burger thickness, grill temperature, wind, and even the starting temperature of the meat can affect cooking speed.
Instead, use an instant-read meat thermometer inserted into the center of the thickest part of the burger.
Burger Doneness Guide
| Doneness | Internal Temperature | Appearance |
| Rare* | 120–125°F | Cool red center |
| Medium Rare* | 130–135°F | Warm red center |
| Medium | 140–145°F | Warm pink center |
| Medium Well | 150–155°F | Slight pink center |
| Well Done | 160°F+ | No pink |
Important: Because burgers are made from ground beef, 160°F is the recommended safe internal temperature.
If you’re unsure, always rely on the thermometer instead of cutting the burger open.
Why it matters: Accurate temperature prevents both undercooked and overcooked burgers.
Common mistake: Guessing doneness by pressing the burger or cutting it open.
Step 8: Add Cheese at the Right Time
If you’re making cheeseburgers, wait until the burgers are almost fully cooked.
Place one slice of cheese on each burger during the last 30–60 seconds of cooking.
Close the grill lid to trap heat and melt the cheese evenly.
Popular cheese choices include:
- American
- Cheddar
- Swiss
- Pepper Jack
- Provolone
- Monterey Jack
- Blue Cheese
Avoid adding cheese too early, as it may overcook or slide off before the burger is ready.
Why it matters: Timing creates perfectly melted cheese without overcooking the meat.
Common mistake: Adding cheese immediately after flipping.
Step 9: Toast the Burger Buns
While the burgers finish cooking, lightly butter the cut sides of the buns if desired.
Place them cut-side down on the grill over medium heat.
Toast for 30–60 seconds, just until lightly golden.
Watch them closely because buns can burn quickly.
A toasted bun adds texture and helps prevent it from becoming soggy once toppings are added.
Why it matters: Toasted buns hold sauces better and provide a satisfying crunch.
Common mistake: Leaving buns unattended until they’re burnt.
Step 10: Let the Burgers Rest Before Serving
Transfer the cooked burgers to a clean plate or tray.
Let them rest for 3–5 minutes before assembling.
Resting allows the juices to redistribute throughout the meat instead of running out with the first bite.
While the burgers rest, prepare your toppings.
Popular toppings include:
- Lettuce
- Tomato
- Onion
- Pickles
- Bacon
- Avocado
- Grilled onions
- Mushrooms
- Jalapeños
- Barbecue sauce
- Ketchup
- Mustard
- Mayonnaise
Build the burgers and serve immediately while they’re still hot.
Why it matters: Resting keeps the burger noticeably juicier.
Common mistake: Serving immediately after removing the burgers from the grill.
How to Know You Did It Correctly
A perfectly grilled burger should have the following characteristics:
- A deep brown, slightly crisp exterior without being burnt.
- Juicy meat that isn’t dry or crumbly.
- An even thickness from edge to center.
- No excessive flare-up marks or blackened patches.
- Cheese melted smoothly over the top, if used.
- A toasted bun that’s crisp on the inside but still soft.
If you’ve used a meat thermometer, the internal temperature should match your desired doneness, with 160°F recommended for ground beef.
Expected Timeline and Results
| Stage | Estimated Time |
| Preheat grill | 10–15 minutes |
| Prepare patties | 10 minutes |
| Grill first side | 3–5 minutes |
| Grill second side | 3–5 minutes |
| Melt cheese | 30–60 seconds |
| Toast buns | 30–60 seconds |
| Rest burgers | 3–5 minutes |
| Total Time | 20–30 minutes |
What You Can Expect
When done correctly, your burgers should be:
- Juicy and flavorful
- Evenly cooked from edge to center
- Nicely browned with a flavorful crust
- Easy to bite without falling apart
- Perfect for classic hamburgers or fully loaded cheeseburgers
Alternative Methods
If your situation or equipment is different, you can still make excellent burgers using these approaches.
| Method | Best For | Notes |
| Two-Zone Gas Grilling | Thick burgers | Sear over direct heat, finish over indirect heat. |
| Cast-Iron Griddle on Grill | Smash burgers | Produces maximum crust while reducing flare-ups. |
| Grill Pan Indoors | Bad weather | Delivers grill-like sear without an outdoor grill. |
| Pellet Grill | Smoky flavor | Adds wood-fired taste with steady temperatures. |
| Charcoal Grill | Traditional BBQ lovers | Rich smoky flavor but requires more temperature management. |
Tip: If you’re grilling frozen burgers, cook them over medium heat and expect several extra minutes of cooking time. Always verify doneness with a meat thermometer rather than relying on appearance.
Common Mistakes to Avoid
Even experienced grillers make small mistakes that can turn a great burger into a disappointing one. Avoid these common issues for consistently better results.
Using Meat That’s Too Lean
While lean ground beef may seem healthier, it contains less fat, which means less moisture and flavor. For the best balance of taste and juiciness, choose 80/20 ground chuck.
Overworking the Meat
Packing the beef tightly when forming patties creates a dense, chewy texture. Handle the meat gently and shape it just enough to hold together.
Skipping the Thumb Indentation
Without a small dimple in the center, burgers often puff into a thick dome. The indentation helps the patty stay flatter for even cooking.
Grilling on a Cold Surface
A grill that hasn’t fully preheated is one of the biggest reasons burgers stick. Always allow the grill to reach cooking temperature before adding the patties.
Pressing the Burgers
Flattening burgers with a spatula forces flavorful juices into the flames instead of keeping them inside the meat.
Flipping Too Often
Turning burgers repeatedly interrupts browning and prevents a proper crust from forming. Flip only once whenever possible.
Guessing Doneness
Color isn’t a reliable indicator of doneness. Some burgers remain pink even after reaching a safe temperature, while others brown before they’re fully cooked.
Use a meat thermometer for accurate results.
Forgetting to Rest the Burgers
Serving immediately after grilling causes juices to run onto the plate. Resting for a few minutes keeps the burger noticeably juicier.
Troubleshooting & Common Problems
| Problem | Possible Cause | Solution |
| Burgers stick to the grill | Grill wasn’t hot enough, or grates weren’t oiled | Preheat thoroughly, clean the grates, and lightly oil them before cooking. |
| Burgers are dry | Lean beef or overcooking | Use 80/20 beef and monitor internal temperature with a thermometer. |
| Burgers fall apart | Patties too loose or flipped too early | Shape gently but firmly, and wait until a crust forms before flipping. |
| Burgers puff up in the middle | No center indentation | Press a shallow thumbprint into each patty before grilling. |
| Outside burns before inside cooks | Grill temperature too high | Lower the heat or move burgers to indirect heat to finish cooking. |
| Uneven cooking | Hot spots on the grill | Rotate burgers or use a two-zone cooking setup. |
| Cheese won’t melt | Lid left open | Close the grill lid for the final 30–60 seconds after adding cheese. |
| Excessive flare-ups | Fat dripping directly onto burners | Move burgers to indirect heat until the flames subside. |
Expert Tips
Small details often separate a good burger from an exceptional one.
- Start with cold beef, not room-temperature meat. Cold patties hold their shape better during grilling.
- Make every patty the same size and thickness so they finish cooking together.
- Keep the patties slightly wider than the buns because they’ll shrink as they cook.
- Clean the grill while it’s still hot after cooking. Residue is much easier to remove.
- For thicker burgers, use two-zone grilling instead of increasing the heat.
- Toast buns with a thin layer of butter for extra flavor and a crisp texture.
- Place cheese on the burgers only during the last minute of cooking.
- Use freshly ground black pepper after grilling if you prefer a stronger pepper flavor.
- Avoid constantly opening the grill lid, as heat escapes quickly and extends cooking time.
- Let toppings complement the burger instead of overpowering it. Fresh lettuce, tomato, onion, and quality cheese are often all you need.
Pro Tip
One detail many grilling guides overlook is checking the burger’s temperature in multiple patties, especially when cooking a large batch. Gas grills often have hotter and cooler zones, so one burger may finish sooner than another even if they went on the grill at the same time.
When to Call a Professional
Grilling burgers is a beginner-friendly DIY task, so professional help is rarely necessary.
However, consider contacting a qualified grill technician if:
- Your gas grill won’t ignite.
- Burners produce uneven or weak flames.
- You smell gas when the grill isn’t operating.
- Ignition repeatedly fails.
- Burners are clogged or heavily rusted.
- Heat remains inconsistent after cleaning the grill.
If you suspect a gas leak, stop using the grill immediately and inspect it according to the manufacturer’s instructions before attempting another cook.
What to Do Next
Now that you’ve mastered how to grill burgers on a gas grill, try experimenting with different burger styles and toppings.
Some ideas include:
- Bacon cheeseburgers
- Mushroom Swiss burgers
- BBQ burgers
- Jalapeño pepper jack burgers
- Smash burgers on a cast-iron griddle
- Turkey burgers
- Veggie burgers
- Stuffed burgers with cheese inside
As you become more comfortable with your grill, you’ll develop a better feel for heat zones, timing, and burger thickness, making each cookout even more successful.
FAQs
1. How long do you grill burgers on a gas grill?
Most burgers take 8–12 minutes total over medium-high heat (400–450°F), depending on their thickness and your preferred doneness. Flip the burgers once halfway through cooking and always verify doneness with a meat thermometer.
2. What temperature should a gas grill be for burgers?
The ideal grill temperature is 400–450°F (medium-high heat). This range creates a flavorful sear while allowing the inside to cook evenly without burning the outside.
3. Should I grill burgers with the lid open or closed?
For most gas grills, keep the lid closed while cooking. Closing the lid circulates heat around the burgers, helping them cook evenly and reducing cooking time. Open it only when flipping or checking the burgers.
4. How often should I flip burgers?
Flip burgers only once whenever possible. Wait until the first side develops a rich brown crust and naturally releases from the grill before turning them over.
5. Why do my burgers stick to the grill?
Burgers usually stick because the grill wasn’t fully preheated, the grates weren’t cleaned, or they weren’t lightly oiled. Another common reason is trying to flip the burgers too soon before a crust has formed.
6. How do I keep burgers juicy on a gas grill?
Use 80/20 ground beef, avoid overworking the meat, don’t press the burgers while cooking, use a meat thermometer to prevent overcooking, and let the burgers rest for 3–5 minutes before serving.
7. Can I grill frozen burgers on a gas grill?
Yes. Frozen burgers can be grilled directly from the freezer, but they’ll require several additional minutes of cooking. Cook over medium heat and check the internal temperature with a meat thermometer instead of relying on appearance.
8. What’s the safest internal temperature for grilled burgers?
Ground beef burgers should reach an internal temperature of 160°F. Insert an instant-read thermometer into the center of the thickest part of the burger to confirm it’s fully cooked.
9. Should I season burgers before or after forming the patties?
Form the patties first, then season both sides just before placing them on the grill. Salting too early can draw moisture out of the meat, leading to drier burgers.
10. What’s the best cheese for grilled burgers?
Popular choices include American, cheddar, Swiss, pepper jack, provolone, and Monterey Jack. Add the cheese during the last 30–60 seconds of cooking and close the lid to help it melt evenly.
Final Thoughts
Learning how to grill burgers on a gas grill is more about mastering a few simple techniques than following a complicated recipe. Choosing quality ground beef, preheating the grill properly, cooking over medium-high heat, flipping only once, and checking the internal temperature with a thermometer will consistently produce juicy, flavorful burgers.
Don’t overlook the small details. A thumbprint in the center of the patty, lightly oiled grill grates, toasted buns, and allowing the burgers to rest for a few minutes all contribute to better texture and taste. These simple habits can make the difference between an average backyard burger and one that rivals your favorite restaurant.
With a little practice, you’ll gain confidence in managing grill temperatures, recognizing when burgers are ready to flip, and serving perfectly cooked burgers every time.
