
Paper flowers are one of the easiest ways to turn ordinary craft paper into a colorful decoration. You do not need advanced crafting skills, expensive equipment, or a complicated template. With paper, scissors, glue, and a few minutes of careful shaping, you can create a simple flower for a card, gift, wall display, party decoration, classroom project, or handmade bouquet.
The trick is not simply cutting several petals and gluing them together. The finished flower looks much better when the petals have slightly different curves, the layers are staggered, and the center is secured without flattening the bloom.
This guide explains how to make a paper flower from basic materials using a layered-petal method. It is beginner-friendly but also includes techniques for making the finished flower look more dimensional and polished.
Featured Snippet
To make a paper flower, cut several petal shapes from colored paper, gently curve each petal, and layer them around a small paper center. Glue the petals together one layer at a time, stagger their positions, then add a center and optional leaves or stem. Allow the glue to dry before handling the flower.
Before You Begin
A simple layered paper flower is a beginner-level craft. You can make a small flower relatively quickly, while a larger or more detailed version takes longer because it requires more petals and shaping.
| Factor | What to Expect |
| Difficulty | Easy |
| Typical time | About 15–30 minutes |
| Cost | Low |
| Skill level | Beginner |
| Best for | Decorations, cards, gifts, school crafts, bouquets |
| Main technique | Cutting, shaping, layering, and gluing |
You can use construction paper, colored craft paper, cardstock, or similar paper. The best choice depends on the appearance you want.
Thin paper is easier to curve but can become floppy. Cardstock produces firmer petals but requires a little more effort when shaping them. Origami paper can also work well when you want crisp folds and relatively clean edges.
Before cutting, decide how large you want the finished flower to be. Your petal size determines much of the final diameter, so planning this first prevents you from making a flower that is too large or too small for your project.
Choosing the Right Approach
There are several legitimate ways to make paper flowers. The best method depends on the look you want rather than on one method being universally better.
| Method | Best Paper | Difficulty | Best For |
| Layered petals | Construction paper/cardstock | Easy | Realistic-looking small flowers |
| Accordion-fold flower | Tissue paper | Very easy | Large decorations and party displays |
| Origami-style flower | Origami paper | Easy–moderate | Folded decorative flowers |
| Fringed flower | Card + crepe/tissue paper | Easy | Fluffy flower centers |
For a first project, the layered-petal method is a good all-purpose choice because you have direct control over the flower’s size, number of petals, color, and shape.
If your main goal is a large hanging decoration, an accordion-fold tissue-paper flower may be more efficient. These flowers are commonly made by stacking tissue paper, folding it accordion-style, securing the center, and separating the layers.
For a flower that depends mainly on folding rather than cutting and layering, an origami approach is another option. However, the layered method gives beginners more freedom to correct the shape as they work.
At a Glance
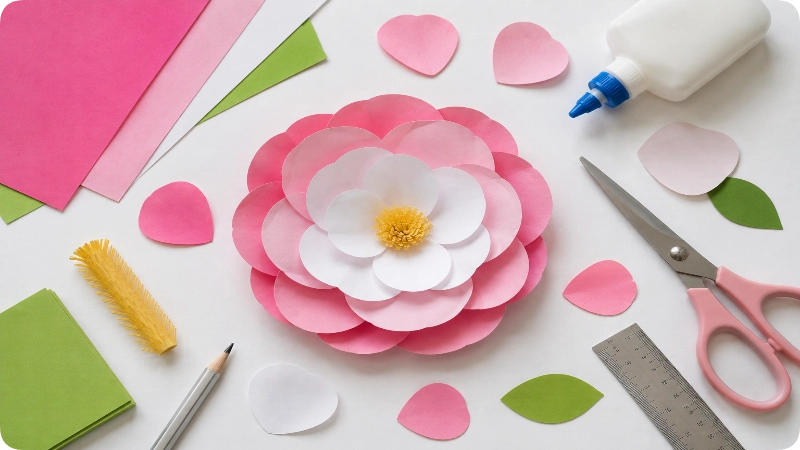
| Detail | Recommendation |
| Difficulty | Beginner |
| Time | 15–30 minutes |
| Cost | Low |
| Skill level | Basic cutting and gluing |
| Best paper | Colored craft paper or light cardstock |
| Best for | DIY decorations and handmade projects |
| Main challenge | Creating evenly spaced, naturally curved petals |
The most important part is consistency. Your petals do not have to be perfectly identical, but they should be similar enough that the flower looks balanced.
Things You’ll Need
| Item | Purpose |
| Colored paper | Creates the petals |
| Green paper | Optional leaves |
| Scissors | Cuts petals and center pieces |
| Pencil | Helps sketch petal shapes |
| Glue | Holds the flower layers together |
| Ruler | Helps create consistently sized petals |
| Small circular object | Optional guide for the flower center |
| Floral wire or pipe cleaner | Optional stem |
| Marker or colored pencil | Optional center details |
You do not need every item on the list. A basic flower can be made with just paper, scissors, and glue. Floral wire, pipe cleaners, leaves, and decorative centers are optional additions. Similar simple paper-flower projects use basic supplies and optional stem materials rather than specialized equipment.
Step-by-Step Guide
1. Choose Your Paper Colors
Select one main color for the petals and another color for the center if you want contrast.
For a natural appearance, choose colors that could reasonably occur together in a flower. For a party decoration or children’s craft, bright contrasting colors can make the flower more playful.
If you are making several flowers, consider choosing two or three related shades instead of using the same color for every layer. A darker inner layer and lighter outer layer can create visual depth without requiring complicated techniques.
2. Draw a Simple Petal Shape
Place your paper on a flat surface and lightly draw one petal.
A simple petal can look like a rounded teardrop: narrower near the base and wider toward the outer end.
Do not make the first petal extremely narrow. A wider base gives you enough material to attach the petals securely.
Once you are happy with the shape, cut it out.
This first petal becomes your template.
3. Cut Multiple Petals
Place the template over your paper and trace enough petals for several layers.
For a beginner flower, start with roughly 10–15 petals. You can use fewer for a sparse flower or more for a fuller one.
Cut carefully around the outlines. Minor differences are fine and can actually make a handmade flower look more natural.
The important thing is to keep the bases reasonably similar because those areas will overlap during assembly.
4. Create Different Petal Sizes
For a more dimensional flower, make at least two petal sizes.
Use larger petals for the outside layer and smaller petals toward the center.
This is one of the easiest ways to improve the appearance of a paper flower. Instead of building every layer from identical pieces, gradually reduce the petal size as you move inward.
You can also make the inner petals slightly narrower or more upright than the outer petals.
5. Curve the Petals
This step makes a major difference.
Take each petal and gently curve it between your fingers. You can roll the outer edge slightly inward or bend the petal so it rises away from the table.
Do not create sharp creases unless you specifically want a folded look.
The goal is to give the paper a soft curve.
For especially thin paper, use gentle pressure because repeated bending can wrinkle or tear it. For cardstock, you may need slightly more pressure to create the desired shape.
6. Prepare the Flower Center
Cut a small circle from contrasting paper.
You can also make a small paper ball, rolled strip, fringe, or several tiny circles if you want a more decorative center.
A simple circular center is enough for a beginner flower.
Keep the center smaller than the overall flower. If it is too large, it can cover too much of the inner petals and make the bloom look flat.
7. Arrange the First Petal Layer
Place the largest petals around an imaginary center point.
Do not glue immediately.
First, arrange the petals so their bases meet or slightly overlap and the spaces between them are relatively even.
This dry arrangement is an important step that many beginners skip. Once glue is applied, repositioning the petals becomes more difficult.
When the arrangement looks balanced, glue the bases together one at a time.
8. Add the Second Layer
Place the next group of petals over the first layer.
Rotate the new petals so they sit between the petals underneath rather than directly on top of them.
This staggered arrangement fills empty spaces and creates a fuller appearance.
Apply glue only where necessary. Too much glue can soak into paper, make it heavy, and flatten the flower.
9. Build the Inner Layer
Continue with your smaller petals.
Angle these petals slightly upward if you want the flower to look more three-dimensional.
The center should gradually become tighter as you move inward.
You do not need to force every petal into the same position. Slight variations in angle can make the finished flower appear less mechanical.
10. Attach the Center
Once the petals are positioned, place a small amount of glue beneath the center piece.
Press it gently into the middle of the flower.
Hold it for a few seconds or follow the drying instructions for your adhesive.
Avoid pressing the entire flower flat while securing the center. You want the outer petals to retain their curves.
11. Add Leaves
If you want a more complete flower, cut one or two simple leaf shapes from green paper.
Fold each leaf gently down the middle to create a subtle central line.
Glue the leaves beneath the flower.
You can use different shades of green if you are making a bouquet or larger arrangement.
12. Add a Stem
For a standing flower, attach floral wire or a pipe cleaner to the back.
Another simple option is to roll a strip of green paper into a narrow stem.
If the flower is going onto a greeting card or wall display, you can skip the stem completely.
13. Let the Flower Set
Place the finished flower on a flat surface and allow the adhesive to set before moving it around.
Once it is stable, gently adjust any petals that became flattened during assembly.
Your paper flower is now ready to use.
How to Know You Did It Correctly
A finished paper flower does not have to be perfectly symmetrical.
Look for these signs:
- The petals are securely attached.
- The flower has visible layers rather than one flat sheet.
- The inner petals are smaller or more tightly arranged.
- The center covers the attachment points.
- The outer petals have some natural curvature.
- The flower remains intact when gently lifted.
- The petals are reasonably balanced around the center.
If the flower looks flat, do not immediately remake it. First, gently reshape the outer petals and lift the inner petals slightly.
The final shape often improves significantly with a little manual adjustment.
Expected Timeline and Results
A basic flower can usually be completed in one short crafting session.
Your first flower may take longer because you are learning how much paper to use, how tightly to curve the petals, and how much glue is necessary.
Once you understand the sequence, making additional flowers becomes faster because you can cut several petals at once.
For a bouquet, prepare your petals in batches. Cut all the large petals first, then the medium petals, then the small petals. This keeps the process organized and makes it easier to create flowers with consistent proportions.
Paper flowers do not wilt like fresh flowers, so they can be reused as decorations when stored carefully and kept away from moisture.
Alternative Methods
Tissue Paper Accordion Flower
For a large, fluffy decoration, stack several sheets of tissue paper and fold the stack back and forth in an accordion pattern. Secure the center, shape the ends, and carefully separate the layers.
This method is particularly useful for party decorations because the finished flower can become quite large without requiring many individually cut petals.
Crepe Paper Flower
Crepe paper is useful when you want petals that can be stretched and shaped.
One simple technique involves cutting a fringed strip, curling the narrow strips, and wrapping the piece into a flower head.
Origami Flower
Origami flowers rely primarily on folding rather than individually cutting many petals.
Use this method when you enjoy precise folds and want the finished flower to have a distinctly folded-paper appearance. Origami paper is particularly convenient because it is already cut into square sheets.
Common Mistakes to Avoid
Using paper that is too heavy
Very thick cardstock can be difficult to curve. If the petals keep springing back, try lighter paper.
Making every petal identical
Perfectly identical petals can make a flower look flat and artificial. Slight differences in curve and angle can add visual interest.
Using too much glue
Excess glue can make paper soggy or cause petals to collapse. Apply a small amount at the attachment points.
Skipping the dry arrangement
Always arrange the petals before gluing the first layer. This lets you correct spacing while the pieces are still movable.
Making the center too large
A large center can hide the inner petals and overwhelm the flower.
Flattening the finished flower
Do not press heavily on the completed bloom. The curved petals are what create its three-dimensional appearance.
Troubleshooting & Common Problems
| Problem | Cause | Solution |
| Flower looks flat | Petals were not curved | Gently reshape the outer edges |
| Petals keep falling off | Too little adhesive or weak attachment area | Add a small amount of glue to the bases |
| Flower looks uneven | Petals are poorly spaced | Rearrange the next layer between existing petals |
| Center looks oversized | Center piece is too large | Replace it with a smaller circle |
| Paper wrinkles | Too much pressure or moisture | Use less glue and shape more gently |
| Petals look crowded | Too many petals in one layer | Reduce the number or increase the flower size |
| Inner petals disappear | Center is too large or petals are too flat | Reduce the center and curve inner petals upward |
Expert Tips
Build from large to small. Larger outer petals create the foundation, while smaller inner petals naturally make the flower appear deeper.
Stagger every layer. Try to place each new petal between two petals underneath. This simple adjustment makes the bloom look fuller.
Curve before gluing. Shaping the paper first gives you more control than trying to bend the flower after all the pieces are attached.
Use color strategically. A slightly darker center can make a simple flower more visually defined. Alternatively, use two shades of the same color for a softer layered effect.
Make the center last. The center hides the attachment area and gives you a chance to correct the appearance of the inner petals before completing the flower.
Test one flower first. If you are making decorations for an event, make one complete sample before cutting dozens of petals. You can adjust the size, paper weight, and number of layers before committing to the full batch.
What to Do Next
Once you have successfully made one paper flower, try changing only one feature at a time.
Make the next flower larger, change the number of petals, use two colors, or create a different center. This makes it easier to see which change actually improves the result.
For a bouquet, vary the flower sizes instead of making every bloom identical. You can combine large flowers with smaller ones and add simple green leaves to fill the arrangement.
Paper flowers can also be attached to cards, gift wrapping, wreaths, classroom displays, photo backdrops, or wall decorations.
FAQs
What is the easiest way to make a paper flower?
The layered-petal method is one of the easiest options for beginners. Cut several simple petals, curve them, arrange them in overlapping layers, glue the bases together, and finish with a small center.
What paper is best for paper flowers?
Colored craft paper, construction paper, light cardstock, tissue paper, crepe paper, and origami paper can all work. The best choice depends on the style. Thinner paper is easier to shape, while cardstock creates more structured petals.
Can I make paper flowers without a template?
Yes. You can draw a simple teardrop or rounded petal yourself. Once you have one petal you like, use it as a guide for the remaining pieces.
How do I make paper flowers look more realistic?
Use multiple petal sizes, curve the petals before assembly, stagger the layers, and avoid making every petal perfectly identical. A smaller, raised center can also give the flower more depth.
How many petals do I need?
There is no single required number. Start with around 10–15 petals for a simple flower and adjust according to the petal size and fullness you want.
Can I make a paper flower without glue?
Yes, depending on the design. Some folded or origami flowers can be constructed mainly through folds, while many layered-petal designs are easier to assemble with glue.
How do I make a large paper flower?
Increase the size of your petal template and use more petals or larger layers. For very large decorations, tissue-paper accordion flowers are another practical option.
How can I make a paper flower bouquet?
Make several flowers in different sizes and colors, attach optional stems, and add paper leaves. Arrange the larger blooms first, then fill gaps with smaller flowers.
Final Thoughts
Learning how to make a paper flower does not require complicated tools or advanced crafting skills. The basic process is simple: cut the petals, shape them, layer them, secure the center, and adjust the final form.
The biggest improvement comes from shaping rather than simply cutting. Curved petals, staggered layers, and a proportionate center can turn a few pieces of colored paper into a much more convincing flower.
Start with one small bloom. Once you understand how the layers work, experiment with different sizes, colors, centers, and paper types to create your own paper-flower designs.
