
Learning how to draw a hibiscus flower is a great way to practice curved lines, petal shapes, proportions, shading, and botanical details without starting with an overly complicated subject. The hibiscus has a recognizable structure: broad petals radiate from a central point, while a distinctive staminal column extends outward from the middle.
The biggest challenge for beginners is usually not drawing the individual petals. It is making all five petals look connected, balanced, and naturally arranged around the center. If every petal is the same size or points in the same direction, the flower can look flat or artificial.
This guide breaks the process into simple construction stages. You will first establish the flower’s overall shape, then build the five petals, add the central stamen, refine the edges, and finally use shading or color to give the flower more depth.
You do not need advanced drawing skills. A pencil, eraser, paper, and a reference image are enough to get started.
Featured Snippet
To draw a hibiscus flower, lightly sketch a center point and a circular guide, then map five broad petals around it. Refine the curved petal edges, add the central staminal column, draw subtle veins, and erase construction lines. Finish with shading or color, keeping the center darker and the petal edges naturally varied.
Before You Begin
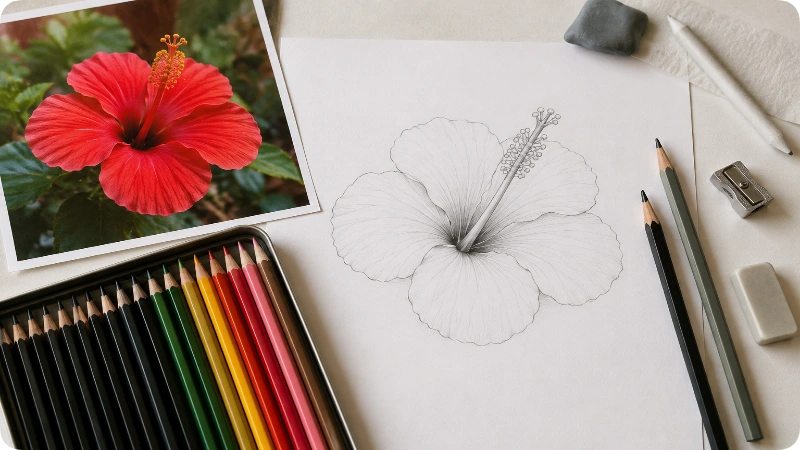
A hibiscus drawing is a simple, low-risk art project, but a few decisions before you start can make the process much easier.
Difficulty: Beginner to intermediate
Time: About 15–30 minutes for a basic drawing; longer for detailed shading
Cost: Low
Skill level: Beginner-friendly
Best medium: Pencil and colored pencils, although pens, markers, watercolor, or digital tools can also work
Reference: A clear photo of an open hibiscus flower is helpful
If this is your first attempt, use a pencil rather than beginning with a permanent pen. Light construction lines allow you to adjust the proportions before committing to the final outline.
A useful approach is to think of the flower as a collection of simple shapes rather than trying to copy the entire bloom at once. Construction circles and directional lines can help you maintain proportion while you work. This is also a common feature of effective beginner drawing tutorials.
Choosing the Right Approach
There are two useful approaches for drawing a hibiscus.
| Approach | Best for | Main advantage | Difficulty |
| Construction-line method | Beginners and realistic sketches | Makes proportions easier to control | Easy |
| Direct outline method | Quick doodles and experienced artists | Faster and more expressive | Easy to moderate |
For a realistic hibiscus, the construction-line method is the better choice. You can establish the overall flower size first and then position each petal around the center.
For a decorative doodle, you can skip most guidelines and build the flower directly from the center outward. This can produce a charming result, but it gives you less control over symmetry and perspective.
At a Glance
| Detail | What to expect |
| Difficulty | Beginner |
| Time | 15–30 minutes |
| Cost | Low |
| Skill level | Beginner to intermediate |
| Best for | Sketching, botanical studies, school projects, cards, and floral artwork |
| Main challenge | Keeping five petals balanced around the center |
| Best starting point | Light construction lines |
Things You’ll Need
| Item | Purpose |
| Drawing paper | Surface for your finished sketch |
| HB or similar pencil | Light construction and initial outline |
| Softer pencil | Darker details and shading |
| Eraser | Removing guidelines and correcting proportions |
| Sharpener | Keeping lines clean and controlled |
| Colored pencils | Optional petal and center color |
| Hibiscus reference photo | Helps you observe natural petal shapes |
| Blending tool or tissue | Optional for soft shading |
You do not need every item on the list. A pencil, eraser, paper, and reference photo are enough for a basic hibiscus drawing.
Step-by-Step Guide
1. Mark the Center of the Flower
Start by placing a small, light circle near the middle of your page. This represents the central area where the petals meet.
Do not make the circle too large. You want enough room around it for five broad petals.
Next, lightly sketch a larger circle around the center. This second circle is not part of the final flower. It acts as a boundary showing approximately how far the petals should extend.
Why it matters:
Without a size guide, it is easy to make the first few petals too large and leave insufficient space for the remaining petals.
Common mistake:
Pressing too hard with the pencil. Keep these first marks light enough to erase later.
2. Divide the Flower Into Five Petal Directions
Imagine five lines spreading outward from the center, similar to the spokes of a wheel.
They do not need to be mathematically perfect. In fact, natural flowers rarely look perfectly symmetrical.
Use the lines to establish the approximate direction of each petal:
- One petal can point upward.
- Two can extend toward the upper left and upper right.
- Two can extend toward the lower left and lower right.
The exact arrangement depends on the angle of your reference flower.
This stage is especially useful because the five-petal structure gives you a framework before you begin drawing complicated curves.
3. Draw the Top Petal
Begin with the petal pointing upward.
Start close to the center and gently curve the first edge outward toward your larger guideline. Then bring the opposite edge back toward the center.
Avoid making the petal look like a perfect heart or teardrop. Hibiscus petals are broad and somewhat irregular, with soft curves rather than rigid geometric edges.
Leave the outline slightly uneven if you are aiming for a natural-looking flower.
Why it matters:
The first petal establishes the scale that you will use to judge the remaining petals.
4. Add the Two Side Petals
Now draw the petals on the upper left and upper right.
Follow the same basic principle: begin near the center, curve outward, reach the approximate boundary, and return toward the flower’s center.
Do not copy the first petal exactly.
Instead, make small differences in the width and angle of each petal. Existing drawing guides commonly emphasize directing the side petals outward rather than making all five petals identical.
At this stage, you should have three major petals.
5. Complete the Bottom Two Petals
Add the lower-left and lower-right petals.
These petals may appear slightly different because of their position and the viewing angle. Depending on your reference image, one may overlap another.
This is an important opportunity to create depth.
Instead of drawing every petal edge as one uninterrupted line, allow an overlapping petal to hide part of another petal’s edge.
Key rule:
Do not force all five petals to have identical outlines. Variation makes the flower feel organic.
6. Refine the Petal Edges
Look carefully at your five-petal outline.
Now replace overly simple curves with more natural edges. Hibiscus petals can have soft waves and slight irregularities, so avoid making every contour perfectly smooth.
Work slowly around the flower.
Ask yourself:
- Are all five petals visible?
- Is one petal dramatically larger than the others?
- Does the center remain visible?
- Do the petals appear connected?
- Is the overall flower still roughly circular?
If the proportions look wrong, erase and adjust them now rather than waiting until the drawing is finished.
7. Draw the Central Staminal Column
One of the easiest ways to make a flower look less like a generic five-petal flower is to include the hibiscus’s distinctive central structure.
From the center, draw a narrow curved column extending outward.
Near its end, add small rounded details representing the anthers or pollen-bearing structures.
Keep the central structure relatively delicate compared with the large petals.
The staminal column is one of the characteristic visual features of hibiscus flowers and is worth including even in a simple beginner drawing.
8. Add Petal Veins
Lightly draw several curved lines from the center toward the outer portions of each petal.
Do not make every line identical.
Some can be longer, some shorter, and some lighter than others.
The lines should follow the direction in which each petal spreads. Avoid drawing straight lines like spokes on a wheel because they can make the flower appear stiff.
For a realistic sketch, use very light pressure. These veins should support the petal shape rather than dominate it.
9. Add the Flower Base and Sepals
Look underneath the petals and add the small green base where the flower attaches to its stem.
You can suggest the sepals with several pointed shapes beneath the bloom.
Keep this area relatively simple unless you are making a botanical illustration.
The goal is to show where the flower transitions into the stem, not to overload the drawing with tiny details.
10. Clean Up the Construction Lines
Now take a step back and inspect your drawing.
Erase the large outer circle, directional lines, and any center guides that are no longer needed.
Do not erase everything at once.
Work around the flower so that you do not accidentally remove important parts of the final outline.
This is also the stage where you can correct small inconsistencies in the petal contours.
11. Strengthen the Final Outline
Once the construction lines are gone, lightly reinforce the parts of the flower that should remain visible.
Use slightly darker lines around the outer edges.
Do not outline every internal vein with the same pressure.
A useful hierarchy is:
- Strongest lines: outer contour and important overlaps
- Medium lines: central structure
- Lightest lines: petal veins and subtle texture
This difference in line weight helps create depth without complicated techniques.
12. Add Shading
Start shading near the center of the flower.
The areas where petals overlap can generally be darker than the open, outward-facing portions of the petals.
Build the shading gradually instead of pressing hard immediately.
For each petal, imagine the surface curving outward from the center. Add a slightly darker tone near the folds and let it become lighter toward the broader areas.
You do not need dramatic shadows to make the flower look dimensional.
A few controlled transitions can be enough.
13. Add Color if Desired
If you want a colored hibiscus, choose a base color and apply it lightly at first.
Pink, red, white, yellow, and other colors can work depending on the flower you are using as a reference.
For a pink or red hibiscus, start with a light overall layer and gradually build stronger color toward the center and folds.
Keep the center visually distinct from the petals.
If using colored pencils, several light layers generally give you more control than applying one heavy layer.
How to Know You Did It Correctly
Your hibiscus drawing does not need to be perfectly symmetrical to look successful.
Check these features before finishing:
- The flower has five recognizable petals.
- The petals connect naturally around the center.
- The central staminal structure is visible.
- The petals vary slightly instead of looking mechanically identical.
- The outer shape feels balanced.
- Construction lines have been removed or softened.
- Shading follows the shape of the petals rather than appearing as random dark patches.
- The center has enough detail to distinguish the flower from a generic five-petal bloom.
If your flower passes these checks, you have captured the main visual structure successfully.
Expected Timeline and Results
A simple hibiscus outline can be completed in roughly 10–15 minutes once you are comfortable with the construction process.
Allow another 10–20 minutes if you want to refine the petals, add veins, shade the flower, or color it.
Your first drawing may look uneven. That is normal.
The most noticeable improvement usually comes from practicing the construction stage rather than repeatedly tracing finished outlines. When you learn to position the five petals before adding details, you gain better control over the flower’s overall proportions.
For a more detailed botanical drawing, expect to spend considerably longer observing the reference and refining individual shapes.
Alternative Methods
Simple Doodle Method
For a quick decorative flower, begin with a small center, draw five loose petals around it, add a curved central stamen, and finish with a stem and a few leaves.
This method is faster and works well for journals, greeting cards, borders, and simple illustrations.
Colored-Pencil Method
Start with the same construction process, but keep your final pencil lines relatively light. Apply several transparent layers of colored pencil rather than one heavy layer.
This gives you more control over highlights and darker folds.
Digital Drawing Method
On a tablet or computer, use a low-opacity sketch layer for the construction circles and petal guides. Create the final outline on a separate layer, then hide or delete the sketch layer before adding color.
The same construction principles apply even when the drawing is digital.
Common Mistakes to Avoid
Making Every Petal Identical
Perfectly matching petals often makes the flower look artificial. Use the construction guides for balance, but allow natural variation.
Making the Center Too Large
A large central circle can leave too little room for the petals. Keep the center relatively compact.
Drawing Petals as Pointed Shapes
Hibiscus petals are broad and flowing. Avoid turning them into narrow leaves or sharp teardrops.
Forgetting Overlap
If every petal appears completely separate, the flower can look flat. Let some edges disappear behind overlapping petals.
Using Heavy Lines Too Early
Dark construction lines are difficult to remove cleanly. Build the drawing lightly and strengthen the final contours later.
Over-Shading the Entire Flower
Too much dark graphite can hide the petal structure. Concentrate stronger shadows around folds, overlaps, and the center.
Ignoring the Central Stamen
The central structure is an important visual clue. Including it can make a simple flower outline much more recognizable as a hibiscus.
Expert Tips
Use a reference at the same viewing angle as your drawing.
A front-facing flower is easier to copy than a flower photographed from a steep angle.
Measure the petals against the outer guideline.
Before finalizing each petal, compare its width and reach with the petals already drawn.
Draw the center first, not last.
Knowing where the flower’s center sits makes it easier to aim each petal correctly.
Use overlap to create depth.
When one petal sits in front of another, hide the appropriate section of the rear petal instead of drawing every boundary completely.
Keep vein lines curved.
Petal veins should follow the form of the petal. Straight lines can make a rounded petal look flat.
Practice one petal separately.
If the full flower feels difficult, draw the shape of a single hibiscus petal several times before attempting all five.
Check the silhouette before shading.
If the outer shape is unbalanced, shading will not fix the underlying proportions.
Leave some areas lighter.
Highlights help communicate the curved surface of the petals and prevent the drawing from becoming a flat block of color.
What to Do Next
Once you can draw a hibiscus from the front, try changing the viewing angle.
Draw one flower slightly tilted upward, another viewed from the side, and another partially hidden behind a leaf.
You can also practice combining the flower with:
- Hibiscus leaves
- A curved stem
- Multiple blooms
- Flower buds
- A tropical background
- A decorative botanical border
For the next exercise, draw the same hibiscus three times without tracing it. Keep the overall five-petal structure consistent while changing the individual petal shapes slightly.
That exercise will help you move from following a tutorial to actually understanding how the flower is constructed.
FAQs
How many petals does a hibiscus flower have?
A typical hibiscus flower is commonly represented with five broad petals. When drawing one, use the five-petal structure as a starting framework, while allowing the petals to overlap or vary depending on the flower’s angle.
How do you draw a hibiscus flower for beginners?
Start with a small center and a light outer guideline. Map five petal directions, draw broad curved petals around the center, add the central staminal column, then erase the construction lines and add simple shading.
What pencil should I use to draw a hibiscus?
An HB pencil is a practical starting point because it can produce light construction marks and a reasonably clear outline. A softer pencil can then be used for darker details and shading.
How do you make a hibiscus drawing look realistic?
Focus on proportion before detail. Keep the five petals balanced, vary their shapes slightly, show overlaps, follow the natural curvature of each petal with your vein lines, and place darker shading near folds and the center.
How do you draw the middle of a hibiscus?
Draw a narrow central staminal column extending outward from the flower’s center. Add small rounded details toward its end to suggest the pollen-bearing structures. Keep the central feature delicate so it does not overpower the petals.
Can you draw a hibiscus without a reference photo?
Yes. You can draw one from memory using five broad petals, a central structure, and a simple stem. However, a reference photo makes it easier to capture natural petal folds, overlaps, and proportions.
Why does my hibiscus look like a generic flower?
The most common reason is that the central structure is missing or the petals are too uniform. Add the distinctive central staminal column, vary the petal shapes slightly, and use overlapping edges to create a more recognizable hibiscus.
How can I make a simple hibiscus drawing more detailed?
After completing the basic outline, add subtle petal veins, folds, layered shading, the flower base, sepals, and a stem. Build these details gradually rather than adding everything at once.
Final Thoughts
Learning how to draw a hibiscus flower becomes much easier when you stop treating the bloom as one complicated shape.
Start with the center. Establish the overall boundary. Position five petals. Refine their curves and overlaps. Then add the central staminal column, veins, shading, and color.
The construction stage is the part worth practicing most. Once you can consistently place the five petals around the center, you can experiment with different angles, styles, colors, and levels of detail.
Your first hibiscus does not need to be perfect. Focus on getting the structure right, then use each new drawing to improve the proportions and natural movement of the petals.
