
Planting pumpkin seeds is one of the most rewarding gardening projects for beginners and experienced gardeners alike. Whether you want to grow giant pumpkins for fall displays, sweet pie pumpkins for baking, or decorative varieties for Halloween, success starts with planting your seeds correctly.
Pumpkins are warm-season plants that thrive in full sun, fertile soil, and consistent moisture. While they’re relatively easy to grow, timing, spacing, and soil preparation make the biggest difference between weak vines and a healthy harvest.
This guide explains exactly how to plant pumpkin seeds, from choosing the best planting method to caring for young seedlings, so you can grow vigorous vines and produce healthy pumpkins.
Featured Snippet
To plant pumpkin seeds, wait until the soil temperature reaches at least 65°F (18°C) after the last frost. Sow seeds 1 inch deep in loose, well-draining soil with full sun exposure. Space seeds according to the pumpkin variety, water thoroughly after planting, and keep the soil consistently moist until seedlings emerge in 5–10 days.
Before You Begin
Growing pumpkins isn’t difficult, but it does require planning because the plants need plenty of room and a long growing season.
| Factor | Details |
| Difficulty | Easy to Moderate |
| Time to Plant | 20–40 minutes |
| Growing Season | 90–120+ days depending on variety |
| Estimated Cost | Low |
| Skill Level | Beginner Friendly |
| DIY or Professional | DIY |
Prerequisites
Before planting pumpkin seeds, make sure you have:
- Warm soil (minimum 65°F/18°C)
- A location receiving 6–8+ hours of direct sunlight daily
- Well-drained, nutrient-rich soil
- Enough space for vines to spread
- Reliable watering access
Avoid planting too early. Cold soil can delay germination or cause seeds to rot before they sprout.
Choosing the Right Approach
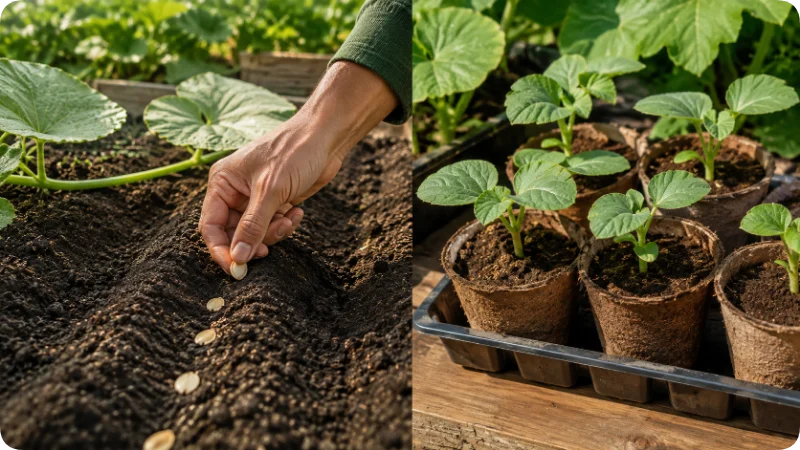
There are two effective ways to plant pumpkin seeds. The best method depends on your local climate and growing season.
| Method | Best For | Advantages | Disadvantages |
| Direct Sowing Outdoors | Most climates | Strong roots, less transplant shock, easier | Must wait until soil warms |
| Starting Seeds Indoors | Short growing seasons | Earlier harvest, longer growing period | Requires careful transplanting |
Direct Sowing
This is the preferred method for most gardeners.
Pumpkins dislike having their roots disturbed, so planting seeds directly into the garden usually produces healthier plants.
Choose this option if:
- Frost season has ended
- Soil is warm
- You have 3–4 months of growing weather
Starting Indoors
If you live in a cooler climate with a short summer, start seeds indoors about 2–4 weeks before the last expected frost.
Use biodegradable pots so seedlings can be transplanted without disturbing the roots.
Decision Tip (Often Overlooked): Many gardening guides recommend starting seeds indoors, but unless your growing season is genuinely short, direct sowing usually produces stronger pumpkin plants with less transplant stress.
At a Glance
| Category | Information |
| Best Planting Time | After the final frost |
| Soil Temperature | 65–95°F (18–35°C) |
| Sunlight | Full sun |
| Soil Type | Loose, fertile, well-draining |
| Soil pH | 6.0–7.5 |
| Seed Depth | About 1 inch |
| Germination Time | 5–10 days |
| Water Needs | Consistently moist, not soggy |
| Best For | Home gardens, raised beds, large containers (small varieties) |
Things You’ll Need
| Item | Purpose |
| Pumpkin seeds | Planting |
| Garden shovel or spade | Preparing soil |
| Compost or aged manure | Improves fertility |
| Garden rake | Leveling soil |
| Watering can or hose | Watering seeds |
| Mulch | Conserves moisture |
| Garden gloves | Protects hands |
| Plant markers | Identifying varieties |
| Organic fertilizer | Supports healthy growth |
| Measuring tape | Proper spacing |
Safety Precautions
Although planting pumpkins is generally safe, following a few basic precautions helps protect both you and your plants.
- Wear gloves when handling compost or manure.
- Lift soil bags carefully to avoid back strain.
- Wash your hands after working in the garden.
- Keep gardening tools away from children.
- Avoid walking on prepared planting beds, which compacts the soil.
- Do not overwater newly planted seeds, as saturated soil encourages rot.
- Apply fertilizers according to package directions to prevent root damage.
Step-by-Step Guide
1. Choose the Best Planting Location
Pumpkins thrive in locations that receive at least 6–8 hours of direct sunlight every day. More sunlight generally produces stronger vines, larger leaves, and better fruit production.
Select an area with:
- Full sun throughout the day
- Good air circulation
- Well-draining soil
- Plenty of room for vines to spread
- Easy access to water
Large pumpkin varieties can spread 15–30 feet, so avoid planting them near walkways or crowded vegetable beds.
Why this matters: Pumpkin plants convert sunlight into the energy needed to produce long vines, flowers, and fruit. Too much shade often results in healthy-looking leaves but very few pumpkins.
Common mistake: Planting pumpkins where nearby trees or fences create afternoon shade.
2. Prepare the Soil
Healthy soil is the foundation of a successful pumpkin harvest.
Start by removing weeds, rocks, and debris from the planting area. Loosen the soil to a depth of about 10–12 inches so roots can grow freely.
Mix several inches of compost or well-aged manure into the soil to improve:
- Drainage
- Moisture retention
- Nutrient availability
- Soil structure
If your soil feels heavy or clay-like, incorporate coarse compost to improve drainage. Sandy soils benefit from additional organic matter to help retain moisture.
Aim for slightly acidic to neutral soil with a pH between 6.0 and 7.5.
Why this matters: Loose, fertile soil encourages deep root development, which supports vigorous vines and larger pumpkins later in the season.
Common mistake: Planting directly into compacted soil without adding organic matter.
3. Create Planting Hills or Raised Mounds
Although pumpkins can be planted in flat rows, many experienced gardeners prefer planting them on small hills or mounds.
Create mounds approximately:
- 12–18 inches wide
- 3–6 inches high
Space the hills according to the mature size of your pumpkin variety.
Typical spacing:
| Pumpkin Type | Space Between Hills |
| Mini pumpkins | 2–4 feet |
| Pie pumpkins | 4–6 feet |
| Medium pumpkins | 6–8 feet |
| Giant pumpkins | 8–12 feet |
Planting on mounds improves drainage and allows the soil to warm faster in spring.
Why this matters: Warm, well-drained soil speeds germination and reduces the risk of seed rot after heavy rain.
Common mistake: Placing hills too close together, leaving vines to compete for sunlight and nutrients.
4. Plant the Pumpkin Seeds
Once the soil has warmed sufficiently, it’s time to sow the seeds.
For each hill:
- Make planting holes about 1 inch deep.
- Place 2–4 seeds in each hill.
- Cover the seeds gently with loose soil.
- Lightly press the soil to eliminate large air pockets.
Avoid planting seeds too deeply. Excess depth slows emergence and can reduce germination.
If planting in rows instead of hills, follow the spacing recommended on your seed packet based on the variety.
Why this matters: Planting multiple seeds increases the chances of successful germination while allowing you to thin weaker seedlings later.
Common mistake: Burying seeds 2–3 inches deep, which often delays or prevents germination.
5. Water Immediately After Planting
Water the planting area thoroughly after sowing.
The goal is to moisten the soil several inches deep without creating puddles.
During germination:
- Keep the soil consistently moist.
- Avoid allowing the top layer to dry completely.
- Do not soak the bed every day if the soil remains damp.
Morning watering is ideal because leaves dry quickly during the day, reducing disease pressure.
Why this matters: Pumpkin seeds require consistent moisture to activate germination. Alternating between very dry and very wet soil can prevent successful sprouting.
Common mistake: Overwatering until the soil becomes muddy and oxygen is displaced from the root zone.
6. Watch for Germination
Under warm conditions, pumpkin seedlings usually emerge within 5–10 days, though cooler soil can extend this to two weeks or more.
Healthy seedlings have:
- Thick stems
- Bright green seed leaves (cotyledons)
- Upright growth
- Even leaf color
If no seedlings appear after two weeks, check whether:
- Soil temperatures were too low
- Heavy rain washed seeds away
- Seeds rotted in waterlogged soil
- Birds or rodents disturbed the planting area
Verification Step (Often Missed): Gently scrape away a small amount of soil from one un-germinated planting spot. A firm, swollen seed is still viable and may simply need more warmth, while a soft or mushy seed has likely rotted and should be replanted.
Common mistake: Digging up every seed repeatedly to “check” if it is growing, which often damages emerging sprouts.
7. Thin the Seedlings
After the seedlings develop their first set of true leaves, thin each hill.
Choose the healthiest plants based on:
- Thick stems
- Upright growth
- Large leaves
- Rich green color
Remove weaker seedlings by cutting them at soil level instead of pulling them out.
Most gardeners leave:
- Two plants per hill for standard varieties
- One plant per hill for giant pumpkins
Why this matters: Overcrowded plants compete for nutrients, water, and sunlight, reducing overall yield.
Common mistake: Pulling unwanted seedlings by hand, which can disturb the roots of the remaining plant.
8. Apply Mulch Around Young Plants
Once seedlings are established, spread a 2–3 inch layer of mulch around the base of each plant.
Suitable mulch includes:
- Straw
- Shredded leaves
- Untreated grass clippings (dry)
- Compost
Keep mulch a few inches away from the stems to prevent excess moisture buildup.
Mulching helps:
- Reduce weeds
- Maintain even soil moisture
- Moderate soil temperature
- Keep developing pumpkins cleaner
Why this matters: Consistent moisture is especially important during early vine growth, and mulch significantly reduces water loss from the soil.
Common mistake: Piling mulch directly against the stems, increasing the risk of rot.
9. Begin Regular Feeding and Watering
As vines begin to grow rapidly, pumpkins require steady care.
Water deeply once or twice a week, depending on rainfall, rather than giving light daily sprinklings.
When feeding:
- Use compost as a natural soil amendment.
- Apply a balanced vegetable fertilizer according to label directions.
- Avoid excessive nitrogen after flowering begins, as it can encourage leaf growth at the expense of fruit production.
Keep watering consistent throughout the season, especially during flowering and fruit development.
Why this matters: Uneven watering and improper fertilization can lead to poor fruit set or cracked pumpkins later in the season.
Common mistake: Allowing the soil to dry completely between heavy waterings.
10. Monitor Growth and Encourage Healthy Vines
Over the following weeks, pumpkin vines will spread quickly and begin producing both male and female flowers.
Inspect plants regularly for:
- Weed competition
- Wilting during dry weather
- Insect damage
- Powdery mildew
- Broken vines
- Poor pollination
If vines become crowded, gently guide them into open spaces instead of forcing sharp bends.
Avoid stepping on vines whenever possible, as damaged stems reduce the plant’s ability to transport water and nutrients.
Why this matters: Early detection of problems is much easier than correcting severe damage after fruit begins developing.
Common mistake: Ignoring vine growth until plants overtake nearby vegetables or pathways, making maintenance difficult.
How to Know You Did It Correctly
A successful pumpkin planting doesn’t end when the seeds sprout. Healthy plants continue to show steady growth throughout the season. Here are the signs that your pumpkin seeds were planted correctly and your plants are developing as expected.
During Germination
Within 5–10 days (or a little longer in cooler soil), you should notice:
- Seedlings emerging evenly from the soil
- Thick, sturdy stems
- Bright green seed leaves (cotyledons)
- Upright growth without leaning excessively
- No signs of mold or seed rot
If germination is patchy, it may simply reflect slight differences in soil temperature or moisture rather than a problem with the seeds.
During Early Growth
After two to three weeks, healthy plants should have:
- Multiple true leaves with a rich green color
- Rapid vine growth
- Strong stems that support the expanding plant
- No yellowing, curling, or significant wilting
The leaves should appear broad and vibrant rather than pale or undersized.
During Flowering
As the vines mature, you’ll begin to see:
- Numerous bright yellow flowers
- Healthy vine extension
- Consistent production of new leaves
- Bees and other pollinators visiting flowers
Male flowers typically appear first, followed by female flowers with a small swollen pumpkin at their base.
During Fruit Development
Once pollination is successful:
- Small pumpkins steadily increase in size
- Fruit develops an even shape
- Vines remain green and healthy
- Leaves continue producing new growth
A healthy plant often supports several pumpkins, depending on the variety and growing conditions.
Quick Success Checklist
✔ Seeds germinated within 5–10 days
✔ Seedlings are upright and green
✔ Leaves continue growing larger each week
✔ Vines spread vigorously across the garden
✔ Flowers appear after several weeks of growth
✔ Small pumpkins develop after successful pollination
Expected Timeline and Results
Growing pumpkins requires patience. While seeds sprout quickly, producing mature pumpkins takes several months.
| Stage | Expected Time |
| Plant seeds | Day 1 |
| Germination | 5–10 days |
| First true leaves | 2–3 weeks |
| Rapid vine growth | 3–6 weeks |
| First flowers | 6–8 weeks |
| Female flowers appear | 7–9 weeks |
| Small pumpkins form | 8–10 weeks |
| Fruit enlargement | 10–16 weeks |
| Harvest | 90–120+ days after planting |
Factors That Affect Growth Speed
Several variables influence how quickly pumpkins mature:
- Pumpkin variety
- Daily temperatures
- Soil fertility
- Water availability
- Sunlight exposure
- Pollination success
Mini pumpkins often mature sooner than large carving pumpkins, while giant varieties usually require the longest growing season.
What to Expect by Season’s End
By harvest time, healthy pumpkin plants should have:
- Thick, sprawling vines
- Large mature leaves
- Fully colored pumpkins
- Hard rinds that resist fingernail pressure
- Dry, woody stems attached to the fruit
Alternative Methods
Although direct sowing is the most common approach, several alternative planting methods work well depending on your space, climate, and gardening style.
1. Start Seeds Indoors
This method is ideal for gardeners in regions with short summers.
Start seeds indoors about 2–4 weeks before the last expected frost using biodegradable pots. Transplant the entire pot into the garden once the soil has warmed.
Best for:
- Northern climates
- Short growing seasons
- Earlier harvests
Pros
- Longer growing season
- Earlier flowering
- Better establishment in cool climates
Cons
- Risk of transplant shock
- Requires indoor growing space
- Extra care during transplanting
2. Plant in Raised Beds
Raised beds warm up faster in spring and provide excellent drainage.
They’re particularly useful if your native soil is heavy clay or drains poorly.
Best for:
- Small gardens
- Poor soil conditions
- Areas with frequent heavy rain
Pros
- Better drainage
- Easier weed control
- Improved soil quality
Cons
- Limited room for sprawling vines
- May require additional watering
3. Grow Pumpkins in Large Containers
Compact pumpkin varieties can be grown successfully in very large containers.
Choose containers that hold at least 20–30 gallons of soil and provide sturdy support if growing semi-vining varieties.
Best for:
- Patios
- Decks
- Urban gardens
Pros
- Saves space
- Easy soil management
- Portable
Cons
- Frequent watering required
- Limited to smaller varieties
- Faster nutrient depletion
4. Vertical Trellising
Small pumpkin varieties can grow on sturdy trellises.
As pumpkins develop, support the fruit with mesh slings or cloth hammocks tied to the trellis.
Best for:
- Tiny gardens
- Raised beds
- Fence gardening
Pros
- Maximizes growing space
- Improves airflow
- Cleaner fruit
Cons
- Not suitable for giant pumpkins
- Requires strong support structures
Common Mistakes to Avoid
Many pumpkin-growing problems begin with simple planting mistakes that are easy to prevent.
Planting Too Early
Cold soil is one of the biggest reasons pumpkin seeds fail to germinate. Wait until the danger of frost has passed and the soil has warmed sufficiently.
Choosing Too Much Shade
Pumpkins need abundant sunlight to produce flowers and fruit. Shaded plants often grow long vines but develop very few pumpkins.
Overwatering the Seeds
Seeds need moisture—not saturated soil.
Constantly soggy soil encourages rot and slows germination.
Planting Too Deep
Seeds planted deeper than about one inch may struggle to emerge, especially in heavy soil.
Crowding the Plants
Pumpkin vines require plenty of room.
Crowded plants compete for sunlight, nutrients, water, and airflow, increasing the likelihood of disease.
Ignoring Soil Quality
Poor soil limits plant growth regardless of how carefully seeds are planted.
Adding compost before planting provides long-term benefits throughout the season.
Watering the Leaves Instead of the Soil
Water sitting on leaves increases the risk of fungal diseases.
Instead, water directly at the base of each plant.
Fertilizing Incorrectly
Applying excessive nitrogen after flowering begins encourages lush vines but fewer pumpkins.
Balanced nutrition throughout the season produces healthier fruit.
Harvesting Too Soon
Pumpkins continue ripening on the vine.
Harvest only when:
- The rind has fully developed color.
- The skin is hard.
- The stem has become dry and woody.
Troubleshooting & Common Problems
| Problem | Likely Cause | Solution |
| Seeds won’t germinate | Soil too cold | Wait for warmer soil and replant if necessary |
| Seeds rot before sprouting | Overwatering or poor drainage | Improve drainage and reduce watering frequency |
| Weak, pale seedlings | Insufficient sunlight | Move plants or choose a sunnier location next season |
| Leaves turn yellow early | Nutrient deficiency or overwatering | Check soil moisture and feed appropriately |
| Flowers appear but no pumpkins form | Poor pollination | Encourage pollinators or hand-pollinate flowers |
| Small pumpkins fall off | Incomplete pollination | Increase bee activity and avoid insecticides during flowering |
| Powdery white coating on leaves | Powdery mildew | Improve airflow, water at soil level, remove badly affected leaves |
| Slow vine growth | Poor soil fertility | Add compost and apply a balanced fertilizer |
| Cracked pumpkins | Irregular watering | Maintain consistent soil moisture throughout fruit development |
| Misshapen fruit | Uneven pollination | Ensure multiple pollinator visits or hand-pollinate early in the morning |
Expert Tips
Small adjustments throughout the growing season can make a noticeable difference in plant health and pumpkin quality. These practical tips go beyond basic planting advice and help you avoid common setbacks.
Warm the Soil Before Planting
If spring weather is cool, cover the planting area with black plastic for one to two weeks before sowing. Warmer soil speeds up germination and gives seedlings a stronger start.
Water Deeply Instead of Frequently
Pumpkins develop extensive root systems. Deep watering once or twice a week encourages roots to grow downward, making plants more resilient during dry weather.
Mulch After Seedlings Are Established
Wait until seedlings are several inches tall before adding mulch. This helps retain moisture, suppress weeds, and keep developing pumpkins clean while still allowing the soil to warm naturally during germination.
Rotate Crops Every Year
Avoid planting pumpkins—or other squash family crops—in the same location year after year. Rotating planting areas helps reduce soil-borne diseases and insect populations.
Encourage Pollinators
Healthy pollination is essential for fruit production.
To attract bees:
- Plant flowering herbs or wildflowers nearby.
- Avoid spraying insecticides during bloom.
- Water early in the morning when pollinators are less active.
Guide Vines Gently
As vines spread, direct them into open spaces before they become tangled. Never force or sharply bend mature vines, as this can damage stems and reduce nutrient flow.
Support Developing Fruit
Place a piece of cardboard, straw, wood, or a flat stone beneath growing pumpkins. This improves airflow, reduces soil contact, and helps prevent rot during wet weather.
Harvest at the Right Time
A ripe pumpkin should have:
- Uniform color
- A hard rind that resists fingernail pressure
- A dry, corky stem
Use clean pruning shears or a sharp knife to cut the pumpkin, leaving several inches of stem attached for longer storage.
When to Call a Professional
Most home gardeners can successfully grow pumpkins without professional assistance. However, expert help may be useful if you experience persistent problems.
Consider contacting your local garden center, agricultural extension service, or plant specialist if:
- Multiple crops fail despite proper planting.
- Soil drainage problems cannot be corrected.
- Plants repeatedly suffer from severe disease.
- Insect infestations become difficult to control.
- You suspect contaminated soil.
- You want to grow competition-sized giant pumpkins and need advanced cultivation advice.
Professional soil testing can also identify nutrient deficiencies or pH issues that aren’t obvious from plant appearance alone.
What to Do Next
Now that you know how to plant pumpkin seeds, the next step is maintaining healthy vines throughout the growing season.
Here’s what to focus on after planting:
- Check soil moisture every few days.
- Remove weeds before they become established.
- Thin seedlings if necessary.
- Apply mulch around growing plants.
- Watch for flowers and pollinator activity.
- Feed plants according to their growth stage.
- Inspect vines regularly for pests and diseases.
- Harvest pumpkins only after they reach full maturity.
Consistent care during the first few weeks sets the stage for vigorous vines and a productive harvest later in the season.
FAQs
1. When is the best time to plant pumpkin seeds?
Plant pumpkin seeds after the last frost when the soil temperature is at least 65°F (18°C). Warm soil promotes faster germination and healthier seedlings.
2. How deep should pumpkin seeds be planted?
Pumpkin seeds should generally be planted about 1 inch deep. Planting much deeper can delay emergence, especially in heavy soils.
3. How many pumpkin seeds should I plant together?
Plant 2–4 seeds per hill. After the seedlings develop true leaves, thin them to the strongest one or two plants, depending on the pumpkin variety.
4. How long does it take pumpkin seeds to germinate?
Under warm conditions, pumpkin seeds usually germinate within 5–10 days. Cooler soil temperatures may extend germination to two weeks or longer.
5. Can I plant pumpkin seeds directly in the ground?
Yes. Direct sowing is the preferred method for most gardeners because pumpkins dislike root disturbance and generally establish better when planted directly outdoors.
6. How much sunlight do pumpkin plants need?
Pumpkins grow best in 6–8 or more hours of direct sunlight each day. Full sun encourages vigorous vines, abundant flowers, and larger fruit.
7. How often should I water pumpkin plants?
Water deeply once or twice a week, depending on rainfall and soil conditions. Keep the soil consistently moist but avoid waterlogged conditions.
8. Why are my pumpkin flowers falling off?
Male flowers naturally bloom and drop before female flowers appear. If female flowers also fall without producing fruit, poor pollination is the most common cause.
9. Can pumpkins grow in containers?
Yes, but choose compact or bush varieties and use a container holding at least 20–30 gallons of well-draining potting mix.
10. How do I know when pumpkins are ready to harvest?
Harvest pumpkins when they have reached their full color, the rind is hard enough to resist a fingernail, and the stem has become dry and woody.
Final Thoughts
Learning how to plant pumpkin seeds correctly is the first step toward a productive and enjoyable gardening season. By waiting for warm soil, preparing a nutrient-rich planting area, providing plenty of sunlight, and maintaining consistent watering, you’ll give your plants the best possible start.
While pumpkins require patience, the reward is well worth the effort. Healthy vines, vibrant flowers, and mature pumpkins are all the result of good planning and regular care. Whether you’re growing pumpkins for cooking, decorating, or simply enjoying the gardening experience, following the steps in this guide will help you achieve a successful harvest year after year.
