
Propagating a monstera means taking a cutting from an existing plant and growing it into a new, independent one. Gardeners do this to multiply a favorite plant, share it with friends, replace a leggy or overgrown specimen, or simply save money instead of buying a new monstera at full price. It works because monstera stems root readily from a node the small bump on the stem where a leaf, aerial root, or new growth emerges.
This guide is for anyone with a mature monstera (deliciosa, adansonii, or a related variety) who wants a reliable, low-cost way to create new plants. You don’t need special equipment or plant experience just a healthy parent plant, a clean cutting tool, and some patience. By the end, you’ll have a rooted cutting ready to pot into soil, and a clear sense of how long the process takes and what can go wrong.
Featured Snippet Answer
To propagate a monstera, cut a stem section containing at least one node and one aerial root, then root it in water or moist sphagnum moss. Keep it in bright, indirect light at 65–85°F. Roots typically appear in 2–6 weeks; pot into soil once roots reach 1–2 inches long.
Before You Begin
- Difficulty:
Easy to moderate
- Time investment:
15 minutes to take the cutting; 2–8 weeks for rooting, checked every few days
- Cost:
Free to under $15 (a clean blade, a jar or pot, and optional rooting hormone or moss)
- DIY vs. professional:
Always DIY; no professional service is needed for this task
- Prerequisites:
A mature monstera with at least one node and, ideally, one visible aerial root; a clean, sharp cutting tool; late spring through summer is the best window, since monstera growth slows in fall and winter
Choosing the Right Approach
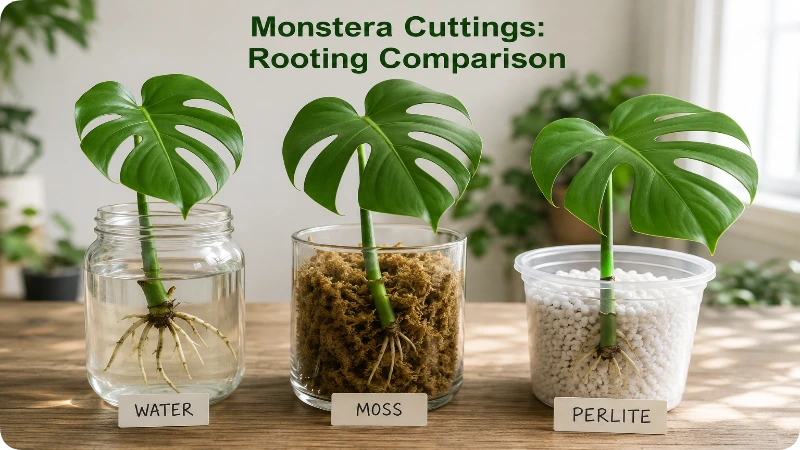
Monstera cuttings can be rooted in water, sphagnum moss, or perlite. Each has real tradeoffs, and picking the wrong one for your situation is a common reason first-time propagators struggle.
| Method | Root Speed | Difficulty | Best For | Drawback |
| Water | Fast (2–4 weeks) | Easiest | Beginners who want to watch root progress | Roots adapted to water can struggle to transition to soil |
| Sphagnum moss | Moderate (3–6 weeks) | Easy | Better long-term results, closer to native soil roots | Harder to monitor root growth without disturbing the cutting |
| Perlite | Moderate (3–6 weeks) | Easy | High-humidity setups, propagation boxes | Needs more consistent moisture management than moss |
Most home growers get the most reliable results with water propagation for the first attempt, then switch to moss for cuttings meant to go straight into soil-based pots, since moss-grown roots handle the transition better.
At a Glance
| Category | Details |
| Difficulty | Easy to moderate |
| Time to root | 2–6 weeks |
| Cost | $0–$15 |
| Skill level | Beginner-friendly |
| Best for | Multiplying a mature monstera, sharing cuttings, replacing leggy growth |
Things You’ll Need
| Item | Purpose |
| Sharp, clean scissors or pruning shears | Makes a clean cut that heals quickly and resists infection |
| Rubbing alcohol | Sterilizes the blade before and between cuts |
| Glass jar or small pot | Holds water, moss, or perlite for rooting |
| Filtered or distilled water (if water propagation) | Reduces mineral buildup that can stress new roots |
| Sphagnum moss or perlite (if using) | Alternative rooting medium that holds moisture without waterlogging |
| Rooting hormone (optional) | Speeds up root development, especially on slower nodes |
| Clear plastic bag or humidity dome (optional, for moss method) | Maintains humidity around the cutting |
Step-by-Step Guide
Identify a node with an aerial root.
Look along the stem for a brown, finger-like aerial root growing near a leaf junction. The node just above or below it is where new roots will form. A cutting with an existing aerial root roots noticeably faster than one without, since the plant has already started growing root tissue there.
Select your cutting section.
Choose a stem segment with at least one node and one healthy leaf. A cutting with two or three nodes tends to establish faster than a single-node cutting, since more nodes mean more potential root sites.
Sterilize your cutting tool.
Wipe the blade with rubbing alcohol. This step is easy to skip, but an unsterilized blade is one of the most common causes of stem rot at the cut site.
Make the cut.
Cut cleanly just below the node at a slight angle. Avoid crushing the stem; a ragged cut heals more slowly and is more prone to rot.
Let the cut callus (optional but recommended).
Set the cutting aside for 30–60 minutes so the fresh wound dries slightly before rooting. This reduces the risk of rot once it’s placed in water or moss.
Place the cutting in your chosen medium.
Water: Submerge the node and aerial root, keeping leaves above the waterline. Use a jar the cutting can rest in without tipping.
Moss: Soak sphagnum moss, wring out excess water, wrap it around the node, and tuck the wrapped cutting into a small pot or bag.
Perlite: Moisten the perlite and insert the node about an inch deep.
Position in bright, indirect light.
Direct sun scorches cuttings before they have roots to support recovery. A spot near an east- or north-facing window works well.
Maintain consistent conditions.
Keep water fresh (change every 5–7 days to prevent bacterial buildup) or moss consistently moist but not soggy. Aim for temperatures between 65–85°F; cooler conditions slow root development significantly.
Watch for root growth.
Roots typically become visible in water within 2–4 weeks, or can be gently checked in moss after about 3 weeks. Wait until roots reach 1–2 inches before potting in soil; potting too early often causes the fragile new roots to snap.
Pot the rooted cutting into soil.
Use a well-draining aroid mix. Water thoroughly after potting and keep the new plant in indirect light for the first 2–3 weeks while it adjusts.
How to Know You Did It Correctly
You’ve succeeded if the cutting produces roots at least 1–2 inches long before yellowing or mushiness appears at the cut site. After potting, a correctly rooted cutting will push out a new leaf within 4–8 weeks; this is the clearest sign the plant has fully transitioned and established itself in soil.
Expected Timeline and Results
Weeks 1–2:
Callusing and initial root hair formation; little visible change
Weeks 2–4:
Visible root nubs emerge from the node (water method shows this earliest)
Weeks 4–6:
Roots reach 1–2 inches; ready for potting
Weeks 6–14:
New leaf growth appears after potting, confirming successful establishment
Growth rate depends heavily on temperature and light; cuttings kept below 65°F often take several weeks longer to root, or may stall entirely.
Alternative Methods
Air layering is worth considering if you don’t want to remove the cutting from the parent plant right away. Wrap moist sphagnum moss around a node while it’s still attached to the main stem, cover it with plastic wrap, and wait for roots to form in place before cutting it free. This method has a higher success rate for beginners because the cutting remains supported by the parent plant’s nutrients while it roots, but it takes up more space and is slower to set up than a standard cutting.
Common Mistakes to Avoid
Cutting without a node.
A leaf alone, without a node, cannot produce roots; this is the single most common reason propagation fails.
Using an unsterilized blade.
This introduces bacteria that cause the cut to rot before roots form.
Overwatering moss-based cuttings.
Soggy moss suffocates developing roots; it should feel like a wrung-out sponge, not wet.
Potting too early.
Moving a cutting to soil before roots are established forces it to rely on undeveloped roots, often causing it to wilt or die.
Placing cuttings in direct sun.
This stresses a plant that has no root system yet to recover lost moisture.
Troubleshooting & Common Problems
| Problem | Cause | Solution |
| Cutting turns mushy or black at the base | Bacterial or fungal rot, often from an unsterilized blade or stagnant water | Remove the affected section, re-cut above the damage with a sterile blade, and restart in fresh water or moss |
| No root growth after 6+ weeks | Low temperature, insufficient light, or no node included in the cutting | Move to a warmer spot (70–80°F), increase indirect light, or confirm the cutting includes a node |
| Roots grow but the cutting still wilts | Cutting dried out between water changes or moss dried completely | Increase watering frequency and check moisture more often |
| Leaf yellows and drops before rooting | Transplant shock or overly wet conditions | Reduce water volume slightly and ensure the container drains excess moisture.e |
| New potted cutting doesn’t produce new growth after 8+ weeks | Root damage during transplant or soil that stays too wet or too dry | Check root health by gently loosening soil; repot into fresh, well-draining aroid mix if roots look brown or mushy |
Expert Tips
- Take cuttings in late spring or summer, when the parent plant is actively growing; cuttings taken during winter dormancy root far more slowly, if at all.
- If you’re propagating multiple cuttings, root at least two or three; not every cutting survives, and having backups avoids starting the whole process over.
- Rooting hormone isn’t required for monstera, but it can meaningfully speed up rooting on cuttings that lack a visible aerial root.
- Avoid moving a water-rooted cutting between mediums (water to moss, for example) mid-process; the root type adapts to its environment, and switching stresses the plant.
When to Call a Professional
Monstera propagation doesn’t require professional help under normal circumstances. The one exception is if you’re trying to propagate a rare or expensive variegated cultivar and want to guarantee success; in that case, a specialty plant nursery can perform tissue culture propagation, which has a much higher success rate for hard-to-root variegated forms than a home cutting.
What to Do Next
Once your cutting has rooted and shows new leaf growth, treat it like an established monstera: water when the top 1–2 inches of soil dry out, provide bright indirect light, and consider a moss pole once it starts producing larger leaves, since monstera plants develop better leaf fenestration (the natural splits and holes) when given something to climb.
FAQs
Can you propagate a monstera from a leaf without a node?
No. A leaf cutting without a node cannot grow roots or new stem tissue. It may stay green for a while, but it won’t establish into a new plant.
Do monstera cuttings need an aerial root to propagate?
An aerial root isn’t strictly required, but it speeds up rooting significantly. A node without an aerial root will still root; it just typically takes longer.
How long can a monstera cutting sit in water before it rots?
Indefinitely, as long as the water is changed every 5–7 days; stagnant water is what causes rot, not time in water itself.
Is it better to propagate monstera in water or soil?
Water and moss are more reliable for beginners because you avoid the risk of overwatering directly in soil. Direct-to-soil propagation is possible but has a lower success rate without consistent humidity control.
Why did my monstera cutting turn yellow?
Yellowing usually indicates either overwatering (soggy moss or stagnant water) or transplant shock shortly after potting. Adjust moisture levels and give the cutting time to recover before assuming it’s failed.
Can I propagate a monstera cutting that has no leaves?
Yes, as long as it has a healthy node. It will take longer to establish since there’s no leaf to photosynthesize and support growth, but nodes alone can still root.
Final Thoughts
Propagating a monstera comes down to one core requirement: a healthy node, kept in the right conditions until it grows roots. Water propagation offers the easiest way to monitor progress, while moss produces roots better suited for a smooth transition to soil. Most failures trace back to a missing node, an unsterilized cut, or potting before roots are ready. Avoid those three mistakes, and a cutting from almost any healthy monstera will root successfully.
