
Harvesting asparagus at the right time and in the right way is the difference between a bed that gets more productive every year and one that fizzles out after a season or two. Because asparagus is a perennial that regrows from an underground crown, every cut you make affects not just this year’s spears but next year’s as well.
This guide is for home gardeners with an established asparagus bed (two years old or more) who want a clear, no-guesswork process for picking spears, judging when to stop, and avoiding the mistakes that stunt future growth. By the end, you’ll know exactly when to start cutting, which harvesting method suits your bed, and how to tell you’re doing it right.
Featured Snippet
Harvest asparagus spears once they reach 6–8 inches tall by snapping them at the natural break point or cutting them at soil level with a knife. Pick every 1–3 days during the 6–8 week harvest window, then stop and let remaining spears fern out to recharge the crown for next season.
Before You Begin
Difficulty: Easy Time per harvest: 5–15 minutes, done every 1–3 days Total harvest season: 6–8 weeks (established beds), 2–3 weeks (third-year beds) Cost: Free to under $15 (optional knife) DIY vs. Pro: Always DIY Prerequisites: An asparagus bed at least two growing seasons old, spears at least 6 inches tall, and a basic understanding of your bed’s planting date (this determines how long you’re allowed to harvest)
The single biggest factor competitors gloss over is bed age. Cutting spears from a first- or second-year planting even if they look thick and tempting steals energy the crown needs to establish itself, and can permanently reduce yields. If your bed was planted from crowns this year or last, skip harvesting entirely and let all spears fern out.
Choosing the Right Approach
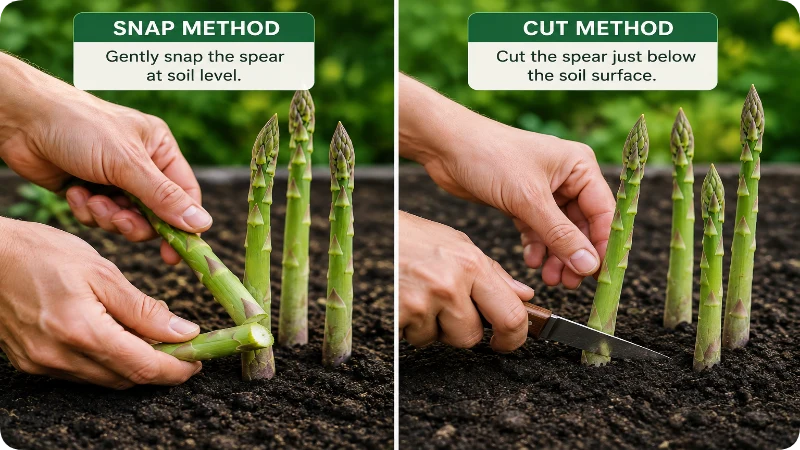
There are two accepted ways to remove a spear, and gardeners genuinely disagree about which is better. Both are valid; the right one depends on your soil and your tools.
| Method | How It Works | Best For | Drawback |
| Snapping | Bend the spear near the base until it snaps naturally at its weak point | Sandy or loose soil, beginners, quick harvests | Leaves a small stub above ground; slightly more waste on woody-based spears |
| Cutting | Slice the spear at or just below the soil line with a knife | Clay or compacted soil, spears that resist snapping cleanly | Higher risk of nicking nearby emerging spears or the crown if cut too deep |
Snapping is generally the safer default because the spear breaks exactly where the tissue turns fibrous, so you rarely take home an inedible section. Cutting gives a cleaner, uniform look for market or gift bundles but requires more care to avoid damaging spears that haven’t broken the surface yet.
At a Glance
| Category | Details |
| Difficulty | Easy |
| Time | 5–15 min per session |
| Cost | $0–$15 |
| Skill Level | Beginner |
| Best For | Established beds, 2+ years old |
| Harvest Window | 6–8 weeks (year 3+), 2–3 weeks (year 3) |
Things You’ll Need
| Item | Purpose |
| Sharp paring or asparagus knife (optional) | Cutting spears cleanly at soil level |
| Basket or shallow container | Carrying spears without bruising tips |
| Gloves (optional) | Comfort when snapping thicker spears |
| Ruler or visual reference | Judging the 6–8 inch harvest height |
| Garden journal or calendar | Tracking planting year and harvest start/stop dates |
Step-by-Step Guide
- Confirm your bed is old enough to harvest. Only cut from beds in their third growing season or later. In year three, harvest lightly for 2–3 weeks; from year four onward, harvest for the full 6–8 week window.
- Check spear height daily during peak season. Spears can grow 1–2 inches per day in warm weather, so a spear that’s too short in the morning may be ready by evening.
- Harvest spears once they reach 6–8 inches. Spears left longer than this start to open their tips and turn woody at the base, reducing quality.
- Snap or cut at the base. For snapping, grip the spear near soil level and bend until it breaks naturally. For cutting, angle the knife just under the soil surface, taking care not to slice into nearby crowns.
- Why it matters: Cutting too deep below the soil can nick the crown or damage unemerged spears that haven’t broken through yet, which won’t show up as a problem until later in the season.
- Harvest every day or every other day during peak growth to keep pace with new spears and prevent any from over-maturing.
- Handle spears gently and place them tip-up in your basket to avoid bruising, which speeds up spoilage.
- Stop harvesting at the end of the designated window (6–8 weeks for mature beds), even if spears are still coming up thick and fast.
- Common mistake: Continuing to harvest because the spears “look too good to leave” is the most common reason beds decline in productivity over a few years.
- Let remaining and new spears grow into ferns after the harvest window closes, and leave the ferns standing until they yellow and die back naturally in fall.
How to Know You Did It Correctly
You’ve harvested correctly if the cut or snapped end is tender enough to eat (no woody fibers), spears were picked before their tips began to open or feather, and you stopped harvesting on schedule, leaving the bed to fern out fully for the rest of the season. A healthy sign for next year is a bed that produces thicker, more numerous spears than the year before; a shrinking or thinning spear count season over season signals the crown was over-harvested.
Expected Timeline and Results
In year three, expect a light harvest of 2–3 weeks with thinner spears. From year four on, a well-established bed yields spears daily or every other day for 6–8 weeks, tapering naturally as the plant shifts energy toward fern growth. A mature bed (5+ years) in good soil can produce roughly half a pound to a pound of spears per plant over the full season, though this varies with variety, spacing, and soil fertility.
Common Mistakes to Avoid
- Harvesting a first- or second-year bed. This is the fastest way to weaken or kill young crowns.
- Letting spears grow past 8–10 inches before picking, resulting in tough, fibrous stalks.
- Harvesting past the recommended window instead of letting the plant fern out and rebuild energy reserves.
- Cutting too deep with a knife, damaging the crown or unemerged neighboring spears.
- Skipping harvest days, which lets spears open and go woody, wasting that flush of growth.
- Removing ferns too early in fall, before they’ve yellowed, which cuts off the plant’s last chance to store energy for next year.
Troubleshooting & Common Problems
| Problem | Cause | Solution |
| Spears are thin and spindly | Bed too young, overcrowded, or nutrient-poor soil | Reduce harvest length this season; top-dress with compost after harvest ends |
| Spears taste bitter or woody | Picked too late, after tips began opening | Harvest more frequently, ideally daily, during warm weather |
| Fewer spears than last year | Over-harvested previous season or ferns cut back too early | Shorten this year’s harvest window and let ferns mature fully in fall |
| Spears growing crooked or misshapen | Compacted soil or an obstruction (rock, mulch clump) near the crown | Loosen surrounding soil gently; avoid piling heavy mulch directly over crowns |
| Hollow or split stalks | Irregular watering during spear emergence | Maintain consistent soil moisture, especially during dry spring spells |
Expert Tips
- Harvest in the morning when spears are cool and crisp; they store better and snap more cleanly than spears picked in afternoon heat.
- Keep a simple tally of spear count per week;k a declining count mid-season is an early warning sign to stop harvesting sooner rather than pushing through the full window.
- If a spear looks thinner than the rest of that day’s harvest, it’s often a sign the crown is signaling it needs a break; consider that your cue to shorten the season slightly.
What to Do Next
Once your harvest window ends, stop cutting entirely and let every new spear grow into a fern. Feed the bed with a balanced fertilizer or compost top-dressing to support fern growth, keep the bed weeded through summer, and leave the ferns standing until they die back on their own in fall before cutting them to the ground for winter.
FAQs
How many years until I can harvest asparagus?
Wait until the third growing season after planting crowns (or the fourth if starting from seed) before harvesting at all.
Can I harvest asparagus every year forever?
Yes, with proper care a bed can produce for 15–20 years or longer, but consistently over-harvesting or under-feeding it will shorten that lifespan.
Is snapping or cutting better for asparagus?
Neither is universally better; snapping is more forgiving in loose soil and for beginners, while cutting gives a cleaner look but requires more precision to avoid damaging the crown.
Why did my asparagus spears turn out thin this year?
Thin spears usually mean the bed is young, was over-harvested last season, or the soil lacks nutrients; scale back harvesting and add compost.
What happens if I don’t harvest asparagus at all?
Unharvested spears simply grow into ferns; skipping a harvest occasionally won’t hurt the plant and can even help a struggling bed recover.
Can I eat asparagus spears that have already opened their tips?
They’re still edible but tend to be tougher and less flavorful than spears picked before the tips feather out.
How long can harvested asparagus be stored?
Fresh spears keep about 3–5 days refrigerated, standing upright in a small amount of water like cut flowers, or wrapped loosely in a damp paper towel.
Final Thoughts
Harvesting asparagus rewards patience more than effort. The actual act of picking a spear takes seconds, but the timing decisions around it when to start, how long to keep going, and when to stop determine whether your bed gets stronger or weaker each year. Stick to the age and window guidelines, harvest consistently during peak season, and let the plant rest and fern out for the remainder of the year, and you’ll have a productive bed for well over a decade.
