
Finding a tick on your dog can be alarming, but removing it correctly helps reduce the risk of skin irritation and diseases that ticks may carry. Whether you discovered a single tick after a walk or several during grooming, using the proper removal method is essential.
This step-by-step guide explains how to remove ticks from dogs safely, what tools to use, common mistakes to avoid, when to contact your veterinarian, and how to prevent future tick infestations.
Featured Snippet
To remove ticks from dogs, use fine-tipped tweezers or a tick removal tool to grasp the tick as close to the skin as possible. Pull upward slowly with steady pressure until the tick releases. Clean the bite area with an antiseptic, dispose of the tick safely, and monitor your dog for signs of illness or infection over the next few weeks.
Before You Begin
Before removing a tick, gather the proper tools and keep your dog calm. Removing the tick improperly can leave mouthparts embedded in the skin or increase irritation.
Difficulty: Easy
Estimated Time: 5–10 minutes per tick
Estimated Cost: Free to $20 if purchasing a tick removal tool
DIY or Professional?
| Situation | Recommendation |
| One or two visible ticks | DIY is appropriate |
| Tick attached near the eye, inside the ear, or mouth | Contact a veterinarian if it is difficult to access |
| Large infestation | Consult your veterinarian |
| Dog becomes sick after a tick bite | Veterinary care is recommended |
Choosing the Right Approach
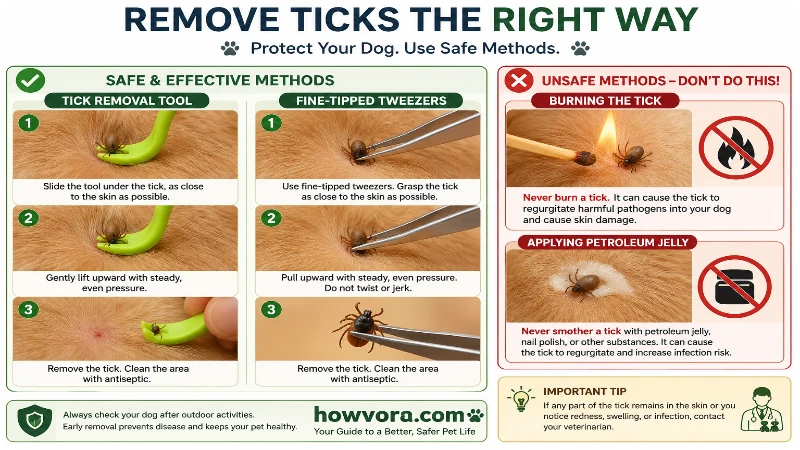
Different removal methods work, but some are much safer than others.
| Method | Pros | Cons | Best For |
| Tick removal tool | Fast, easy, reduces squeezing | Requires purchasing tool | Best overall |
| Fine-tipped tweezers | Widely available | Requires careful technique | Most homeowners |
| Veterinary removal | Safest for difficult cases | Costs more | Sensitive areas or uncooperative dogs |
| Petroleum jelly, alcohol, nail polish, burning | Not recommended | Can stress the skin and increase irritation | Avoid |
Why the Recommended Method Is Best
Using tweezers or a tick removal tool removes the entire tick with minimal pressure. Methods such as burning the tick or covering it with petroleum jelly may delay removal and can cause the tick to release more saliva into the bite.
At a Glance
| Factor | Details |
| Difficulty | Easy |
| Time | 5–10 minutes |
| Cost | Free–$20 |
| Skill Level | Beginner |
| Results | Immediate tick removal |
Things You’ll Need
| Item | Purpose |
| Fine-tipped tweezers or tick remover | Remove the tick |
| Disposable gloves | Protect your hands |
| Antiseptic solution | Clean the bite area |
| Rubbing alcohol | Kill and preserve the tick if desired |
| Small sealed container | Store or dispose of the tick |
| Treats | Keep your dog calm and reward cooperation |
Safety Precautions
- Wear disposable gloves whenever possible.
- Keep children away during tick removal.
- Never squeeze the tick’s body.
- Avoid twisting or jerking while pulling.
- Do not use matches, cigarettes, or open flames.
- Do not use petroleum jelly or nail polish to force the tick out.
- Wash your hands thoroughly afterward.
- Monitor your dog for redness, swelling, fever, tiredness, or loss of appetite following the bite.
Step-by-Step Guide
Step 1: Keep Your Dog Calm
Choose a quiet area with good lighting. Have another person gently hold your dog if necessary. Offer treats to reduce stress.
Why It Matters
A calm dog is less likely to move suddenly, making complete removal easier.
Success Looks Like
Your dog remains reasonably still while you work.
Common Beginner Mistakes
- Rushing
- Working in poor lighting
- Not securing the dog
Step 2: Locate the Tick
Part the fur until you can clearly see where the tick enters the skin.
Why It Matters
Good visibility allows you to grip the tick close to the skin rather than squeezing its body.
Success Looks Like
The tick’s head and attachment point are clearly visible.
Common Beginner Mistakes
- Pulling through fur
- Grabbing only the body
Step 3: Remove the Tick
Using fine-tipped tweezers or a tick remover, grasp the tick as close to your dog’s skin as possible. Pull upward slowly using steady, even pressure until the tick releases.
Why It Matters
Slow, steady pressure helps remove the entire tick.
Success Looks Like
The tick comes out intact without breaking apart.
Common Beginner Mistakes
- Twisting
- Jerking
- Crushing the tick
- Pulling too quickly
Step 4: Clean and Monitor
Clean the bite area with an antiseptic and inspect the skin over the next several days.
Dispose of the tick by placing it in rubbing alcohol, sealing it in a container, or wrapping it securely before discarding it.
Why It Matters
Cleaning reduces the chance of skin irritation, while monitoring helps identify problems early.
Success Looks Like
The skin remains clean with only mild redness that gradually improves.
Common Beginner Mistakes
- Leaving the area dirty
- Forgetting where the bite occurred
- Ignoring signs of illness
How to Know You Did It Correctly
Successful tick removal usually has these signs:
- The tick is completely removed.
- No parts remain visibly attached.
- The bite area has only mild redness.
- Your dog behaves normally afterward.
- The skin gradually heals over several days.
If you believe mouthparts remain embedded, avoid digging into the skin. Contact your veterinarian if irritation develops.
Expected Timeline and Results
| Time | Expected Result |
| Immediately | Tick removed successfully |
| 24 hours | Mild redness may remain |
| 2–7 days | Skin begins healing |
| 1–4 weeks | Continue monitoring for signs of tick-borne illness |
Seek veterinary advice if your dog develops fever, swollen joints, tiredness, loss of appetite, or unusual behavior after a tick bite.
Alternative Methods
Tick Removal Hook
Advantages
- Easy to use
- Less likely to squeeze the tick
Disadvantages
- Requires purchasing a tool
Best For
Pet owners who spend time outdoors frequently.
Veterinary Removal
Advantages
- Professional evaluation
- Useful for difficult locations
Disadvantages
- Costs more
- Requires an appointment
Best For
Ticks near the eyes, ears, mouth, or deeply embedded ticks.
Common Mistakes to Avoid
| Mistake | Why It Happens | Consequences | Prevention |
| Twisting the tick | Old advice | Mouthparts may remain | Pull straight upward |
| Crushing the tick | Poor grip | Increased contamination | Grip near the skin |
| Using home remedies | Internet myths | Delays removal | Remove immediately with tweezers |
| Skipping cleaning | Forgetfulness | Skin irritation | Always disinfect afterward |
| Ignoring symptoms | Assuming everything is fine | Delayed treatment | Monitor your dog for several weeks |
Why Many Attempts Fail
Most unsuccessful tick removals happen because people:
- Panic and pull too quickly.
- Grip the tick’s swollen body instead of its head.
- Use ineffective home remedies.
- Fail to inspect their dog completely.
- Stop monitoring after removal.
Checking your dog’s entire body after outdoor activities greatly improves early detection.
Troubleshooting & Common Problems
| Problem | Possible Cause | Solution |
| Tick breaks apart | Pulled too quickly | Leave small mouthparts alone if superficial and monitor the area; contact a veterinarian if irritation develops |
| Dog keeps moving | Anxiety | Use treats or have another person assist |
| Skin stays red | Normal irritation or infection | Monitor for improvement; seek veterinary advice if worsening |
| Multiple ticks found | Heavy exposure | Remove each tick and discuss prevention with your veterinarian |
| Tick hidden under thick fur | Poor visibility | Use a comb and bright lighting |
Expert Tips
- Check your dog after every hike or walk through tall grass.
- Feel for small bumps while petting your dog since ticks can be difficult to see.
- Examine ears, neck, under the collar, between the toes, around the tail, and under the legs.
- Use veterinarian-recommended tick prevention products year-round in areas where ticks are active.
- Keep grass trimmed and remove leaf litter to reduce ticks around your yard.
When to Call a Professional
DIY removal is usually sufficient when the tick is easy to reach and your dog remains calm.
Contact your veterinarian if:
- The tick is attached near the eyes or inside the ears.
- You cannot safely remove it.
- The bite becomes swollen, painful, or produces discharge.
- Your dog develops a fever, weakness, limping, swollen joints, or loss of appetite.
- You find dozens of ticks on your dog.
What to Do Next
After removing the tick:
- Check your dog daily for additional ticks.
- Wash bedding if needed.
- Vacuum areas where your dog rests.
- Maintain the regular tick prevention recommended by your veterinarian.
- Inspect yourself and family members after outdoor activities.
- Keep your yard trimmed to reduce tick habitat.
FAQs
Can I remove a tick from my dog with my fingers?
It is not recommended. Fine-tipped tweezers or a tick removal tool provides better control and reduces the risk of squeezing the tick.
Should I kill the tick before removing it?
No. Remove it first using steady pressure, then dispose of it safely.
What if the tick’s head stays in my dog?
Small mouthparts may sometimes remain. Avoid digging into the skin. Monitor the area and contact your veterinarian if redness, swelling, or infection develops.
How soon should I remove a tick?
Remove it as soon as you discover it. Prompt removal reduces irritation and may lower the risk of disease transmission.
Can dogs get sick from tick bites?
Yes. Some ticks can transmit diseases. Monitor your dog for several weeks and contact your veterinarian if unusual symptoms develop.
Should I save the tick?
You may place it in a sealed container with rubbing alcohol. Your veterinarian may request it if your dog later becomes ill.
How often should I check my dog for ticks?
Check after every walk in wooded areas, tall grass, or brush, especially during seasons when ticks are common.
Can indoor dogs get ticks?
Yes. Ticks can be brought indoors on people, other pets, or after occasional outdoor trips.
Final Thoughts
Learning how to remove ticks from dogs correctly is an important part of routine pet care. Using fine-tipped tweezers or a tick removal tool, pulling with slow, steady pressure, and cleaning the bite afterward helps protect your dog’s health. Regular tick checks and consistent preventive care are the best ways to reduce future tick problems and catch any issues early.
