
Tulips are among the easiest and most elegant flowers to draw. Their smooth, cup-shaped petals, graceful stems, and simple leaves make them an excellent subject for beginners while still offering enough detail to challenge experienced artists.
If you’re creating a greeting card, practicing botanical illustration, filling a sketchbook, or learning the fundamentals of flower drawing, mastering tulips helps improve your understanding of basic shapes, symmetry, and natural curves.
In this guide, you’ll learn exactly how to draw tulips step by step, from sketching the basic flower shape to adding shading, texture, and realistic details. You’ll also discover common mistakes to avoid and simple techniques that make your drawings look more natural.
Featured Snippet
To draw tulips, begin by sketching a simple oval or cup shape for the flower bud. Add overlapping petals, draw a gently curved stem, and attach long, pointed leaves. Refine the outlines, erase construction lines, then add shading and texture to create depth and a realistic tulip drawing.
Before You Begin
Learning to draw tulips doesn’t require expensive art supplies or advanced artistic skills. Because tulips have clean, recognizable shapes, they’re ideal for practicing proportion, symmetry, and shading.
| Category | Details |
| Difficulty | Easy |
| Time Required | 20–45 minutes |
| Estimated Cost | $0–$25 (depending on supplies) |
| Skill Level | Beginner to Intermediate |
| Best For | Sketching, botanical drawing, journaling, coloring pages, art practice |
| DIY or Professional | DIY |
Before You Start
- Choose a clear reference photo or observe a real tulip.
- Use light pencil strokes for your initial sketch.
- Keep an eraser nearby for refining shapes.
- Work slowly instead of pressing hard with the pencil.
Choosing the Right Approach
There are several ways to draw tulips depending on your artistic goal.
| Method | Best For | Advantages | Drawbacks |
| Simple Outline Drawing | Beginners | Easy to learn quickly | Less realistic |
| Realistic Pencil Drawing | Intermediate artists | Natural depth and texture | Takes longer |
| Botanical Illustration | Detailed artwork | Highly accurate | Requires patience |
| Cartoon Tulip | Kids and crafts | Fun and simple | Limited realism |
If you’re learning for the first time, begin with a simple outline before moving on to realistic shading.
At a Glance
| Feature | Details |
| Flower Type | Tulip |
| Drawing Style | Realistic or Simple Outline |
| Main Shapes | Oval, Cup, Curved Lines |
| Number of Petals | Usually 6 visible depending on angle |
| Main Challenge | Keeping petals symmetrical |
| Recommended Pencil | HB for sketching, 2B–4B for shading |
Things You’ll Need
| Item | Purpose |
| Drawing paper | Smooth surface for sketching |
| HB pencil | Initial construction lines |
| 2B or 4B pencil | Shading and darker outlines |
| Eraser | Remove guidelines |
| Sharpener | Maintain clean lines |
| Blending stump or tissue (optional) | Smooth pencil shading |
| Reference image | Improve accuracy |
Step-by-Step Guide
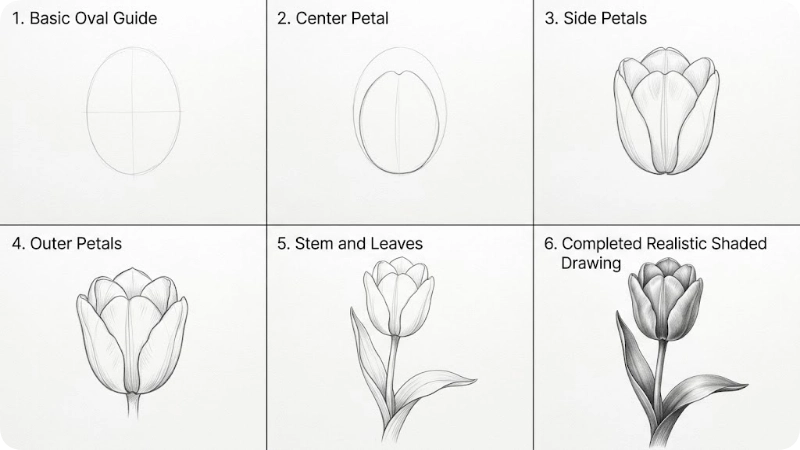
Step 1: Sketch the Basic Flower Shape
Lightly draw an upright oval or rounded cup shape.
This acts as the framework for the tulip bloom and helps keep the petals balanced.
Avoid making the shape too narrow or too wide.
Why it matters
A balanced foundation makes every petal easier to place correctly later.
Common mistake
Many beginners immediately draw petals individually, causing uneven flower proportions.
Step 2: Draw the Center Petal
Inside the cup shape, sketch a slightly pointed petal rising from the center.
Keep the top gently rounded rather than sharply pointed.
The center petal should be the tallest visible petal.
Why it matters
This establishes the flower’s overall symmetry.
Step 3: Add the Side Petals
Draw one petal on each side of the center.
Allow each petal to overlap slightly behind the middle petal.
Tulip petals naturally wrap around one another, so avoid leaving gaps.
Common mistake
Drawing petals separately instead of overlapping them makes the flower appear flat.
Step 4: Complete the Outer Petals
Add the remaining petals behind the front layer.
Only portions of these petals may be visible depending on the viewing angle.
Don’t make every petal identical.
Real flowers have slight variations in size and curvature.
Why it matters
Small differences create a much more natural-looking flower.
Step 5: Draw the Stem
From the bottom center of the flower, sketch a long, gently curved stem.
Tulip stems are relatively thick compared to many flowers and usually remain smooth.
Avoid making the stem perfectly straight unless drawing a freshly cut tulip standing upright.
Common mistake
Very thin stems often make the flower look unrealistic.
Step 6: Draw the Leaves
Tulip leaves are long, smooth, and spear-shaped with gently wavy edges. Start each leaf near the base of the stem and let it curve outward before tapering to a pointed tip.
Most tulips have two to four visible leaves.
Why it matters
Leaves add balance to the composition and make the flower instantly recognizable.
Common mistake
Making the leaves too short or too narrow. Tulip leaves are typically longer and broader than many beginners expect.
Step 7: Refine the Petal Shapes
Erase unnecessary construction lines and smooth the petal edges.
Look closely at each petal’s outline. Slight curves, overlaps, and uneven edges create a more natural appearance than perfectly symmetrical shapes.
If you’re drawing from a reference photo, compare your sketch to the original before darkening any lines.
Why it matters
Cleaning up the sketch before shading prevents messy artwork later.
Step 8: Add the Final Outline
Using a slightly darker pencil (2B or 4B), carefully trace the finished outlines.
Apply a little more pressure around overlapping petals to emphasize depth.
Avoid making every outline equally dark. Slight line-weight variation gives the drawing a more professional look.
Common mistake
Heavy outlines around every edge can make the flower resemble a coloring page instead of a realistic drawing.
Step 9: Add Shading
Imagine a light source coming from one direction.
Shade:
- The base of each petal
- Areas where petals overlap
- One side of the stem
- The underside of leaves
Leave highlights untouched to create the illusion of reflected light.
Build the shading gradually using several light layers instead of one dark layer.
Why it matters
Shading transforms a flat sketch into a three-dimensional flower.
Common mistake
Pressing too hard during the first shading layer makes smooth blending difficult.
Step 10: Add Texture and Final Details
Tulip petals have subtle veins rather than deep ridges.
Use faint pencil strokes to suggest:
- Gentle petal veins
- Slight folds
- Soft curves
- Natural shadows near overlapping petals
If desired, blend lightly with a blending stump or tissue while preserving highlights.
Step back and compare the overall proportions before calling the drawing complete.
How to Know You Did It Correctly
A finished tulip drawing should have:
- Balanced, overlapping petals
- A sturdy stem connected naturally to the bloom
- Long, flowing leaves
- Smooth curves instead of jagged lines
- Consistent light source
- Soft shading with visible highlights
- Natural-looking proportions
If your flower looks recognizable even without color, you’ve built a strong foundation.
Expected Timeline and Results
| Experience Level | Estimated Time | Expected Result |
| Beginner | 30–45 minutes | Clean outline with basic shading |
| Intermediate | 20–35 minutes | More realistic petals and depth |
| Advanced | 15–30 minutes | Detailed botanical-style tulip |
You’ll usually notice significant improvement after drawing the same tulip three or four times from different angles.
Video for How to Draw Tulips
The following is the detailed video on how to draw tulips:
Alternative Methods
If you’d like to expand your drawing skills, try these variations:
Draw from a Real Flower
Working from a fresh tulip helps you observe natural curves, subtle imperfections, and realistic lighting.
Use Colored Pencils
After completing the pencil sketch, layer colors gradually.
Popular tulip colors include:
- Red
- Pink
- Yellow
- White
- Purple
- Orange
Blend gently to create smooth color transitions.
Try a Digital Drawing
Many drawing apps allow you to sketch construction lines on one layer and complete clean line art on another, making corrections much easier.
Draw a Bouquet
Once you’re comfortable with a single bloom, arrange multiple tulips at different heights and angles for a more dynamic composition.
Common Mistakes to Avoid
- Drawing petals separately instead of overlapping them
- Making every petal identical
- Using very dark construction lines
- Creating perfectly straight stems
- Forgetting leaf thickness
- Applying heavy shading too early
- Ignoring the direction of the light source
- Over-blending until all texture disappears
- Making the flower too symmetrical
- Skipping reference images
Troubleshooting & Common Problems
| Problem | Cause | Solution |
| Flower looks flat | No shading | Add shadows where petals overlap |
| Petals appear uneven | Poor initial framework | Begin with a simple oval guide |
| Stem looks weak | Too thin | Increase stem thickness slightly |
| Leaves seem unnatural | Incorrect proportions | Make leaves longer and broader |
| Drawing appears stiff | Straight lines | Add gentle natural curves |
| Shading looks patchy | Pressing too hard | Build shading gradually in layers |
Expert Tips
- Rotate your paper instead of twisting your wrist while drawing curved petals.
- Squint at your reference image to identify the largest shadow areas first.
- Use an HB pencil for construction and switch to softer pencils only after the sketch is accurate.
- Compare negative space the empty areas between petals to catch proportion errors.
- Flip your drawing upside down occasionally. This helps reveal symmetry issues you might otherwise overlook.
- Keep highlights clean by avoiding unnecessary erasing after shading begins.
- Practice drawing only tulip petals for a few minutes before attempting an entire flower.
When to Call a Professional
Most people can learn to draw tulips independently through practice. However, consider taking an art class or online drawing course if you want to:
- Learn botanical illustration
- Prepare a professional portfolio
- Improve advanced shading techniques
- Master realistic floral compositions
- Receive personalized feedback on your artwork
What to Do Next
Now that you’ve completed your tulip drawing:
- Draw the same tulip from a different angle.
- Experiment with colored pencils or watercolor.
- Practice drawing closed, partially open, and fully open tulips.
- Create a bouquet using flowers of different heights.
- Try drawing tulips with different lighting directions to improve your shading skills.
Consistent practice is the fastest way to improve. Even one sketch a day can noticeably strengthen your observation and drawing abilities over time.
FAQs
1. Is drawing a tulip easy for beginners?
Yes. Tulips are one of the easiest flowers to draw because they are built from simple shapes like ovals, curves, and pointed petals. Beginners can create a recognizable tulip with just a few basic sketching techniques.
2. How many petals does a tulip have?
A real tulip has six petals (technically three petals and three sepals that look alike). Depending on the viewing angle, you may only see three to six petals in your drawing.
3. What pencil is best for drawing tulips?
An HB pencil is ideal for sketching the basic outline, while a 2B or 4B pencil works well for darker outlines and smooth shading. Many artists use both for better control.
4. How do I make my tulip drawing look realistic?
Focus on overlapping petals, smooth curves, gradual shading, and a consistent light source. Avoid making every petal identical, and leave small highlights to create depth.
5. Should I draw from a real flower or a photo?
Either works well. A real tulip helps you observe natural lighting and subtle details, while a high-quality reference photo allows you to study the flower at your own pace.
6. Can I color my tulip after drawing it?
Absolutely. Colored pencils, markers, watercolor, or digital painting can all enhance your finished sketch. Apply color in light layers and gradually build richer tones for a realistic appearance.
7. Why does my tulip look flat?
Flat drawings usually result from little or no shading. Add darker values where petals overlap, shade one side of the stem and leaves, and keep highlights on the side facing the light source.
8. How can I improve my flower drawing skills?
Practice drawing individual petals, stems, and leaves before combining them into complete flowers. Drawing tulips from different angles and under different lighting conditions will quickly improve your observation and sketching skills.
Final Thoughts
Learning how to draw tulips is an excellent way to build your confidence as an artist. Their elegant shape, simple structure, and graceful curves make them ideal for practicing proportion, shading, and natural line work.
Start with light construction lines, build the petals gradually, and resist the urge to rush the shading. Every tulip you draw will improve your understanding of flower anatomy and help you create more realistic botanical artwork.
Remember that even experienced artists begin with simple shapes. Focus on accuracy before details, practice consistently, and don’t be afraid to redraw the same flower several times. Over time, you’ll be able to sketch tulips from memory and incorporate them into bouquets, floral illustrations, greeting cards, journals, and larger art projects.
With patience and regular practice, you’ll soon be creating tulip drawings that are both beautiful and lifelike.
