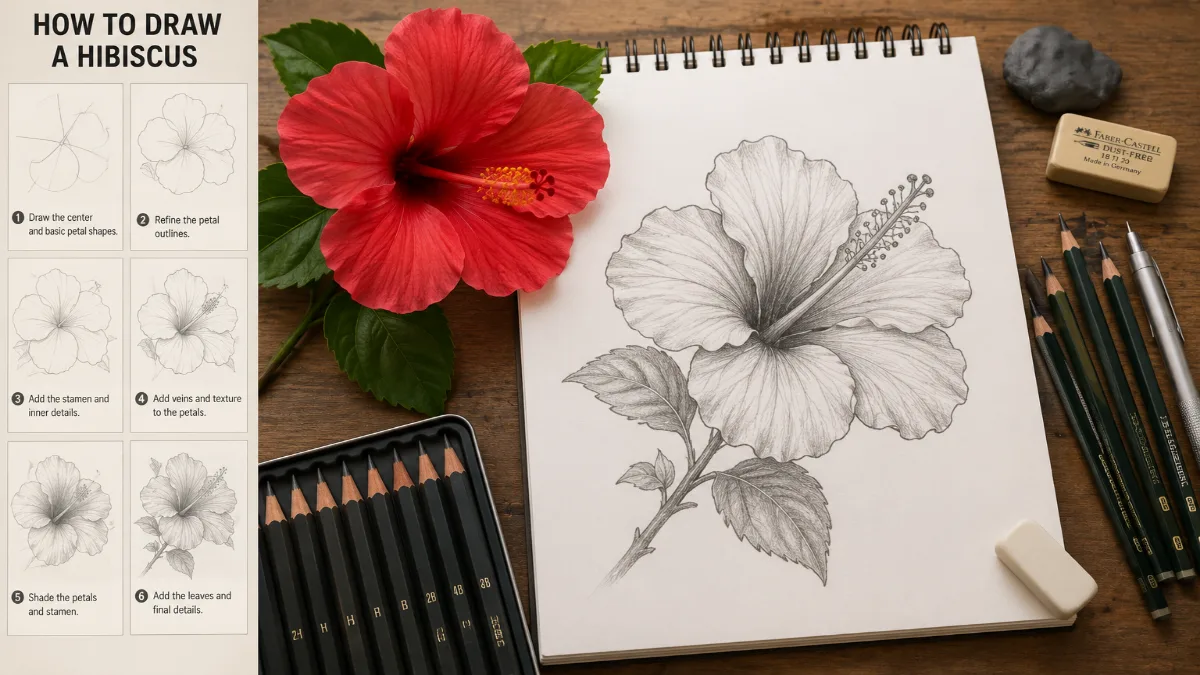
Drawing a hibiscus flower is an excellent way to practice flower sketching while creating a beautiful tropical design. Known for its large petals, prominent stamen, and elegant shape, the hibiscus is one of the easiest flowers for beginners to recognize and draw.
If you’re creating botanical artwork, decorating a journal, improving your drawing skills, or preparing artwork for crafts and designs, learning how to draw a hibiscus flower step by step can help you achieve realistic and attractive results.
By following this guide, you’ll learn how to sketch the flower’s structure, shape the petals correctly, add realistic details, and finish with shading for a polished drawing.
Featured Snippet
To draw a hibiscus flower, start by sketching a small circle for the center and draw five large petals around it. Add the flower’s long stamen extending from the center, refine the petal edges, erase guide lines, and finish with shading and details. Using simple shapes first makes the flower easier to draw accurately.
Before You Begin
| Factor | Details |
| Difficulty | Easy to Moderate |
| Time Required | 20–45 minutes |
| Cost | Very Low |
| Skill Level | Beginner to Intermediate |
| DIY or Professional? | DIY |
| Best For | Sketching, botanical art, coloring projects, journaling |
Before starting, understand that a hibiscus flower typically has:
- Five large overlapping petals
- A central flower tube
- A long protruding stamen
- Soft curved edges
- Visible veins on petals
Observing reference photos can help you understand the flower’s natural shape before drawing.
Choosing the Right Approach
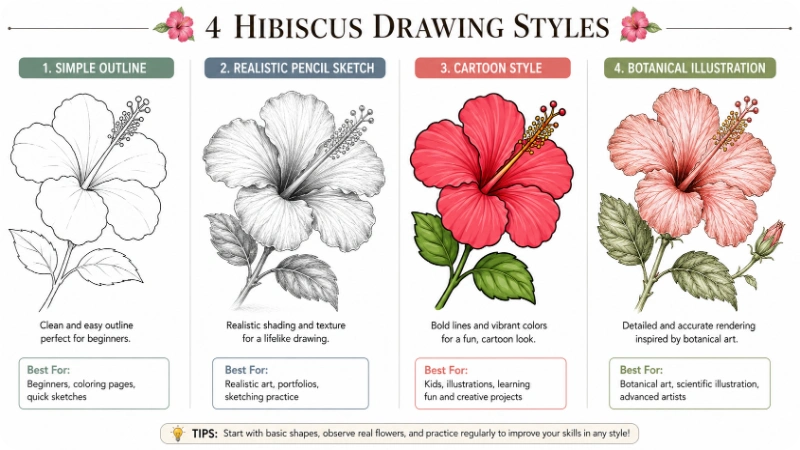
Different drawing styles work well for hibiscus flowers depending on your goal.
| Method | Best For | Difficulty |
| Simple Outline Drawing | Beginners | Easy |
| Realistic Pencil Drawing | Detailed artwork | Moderate |
| Cartoon Hibiscus | Crafts and coloring pages | Easy |
| Botanical Illustration | Educational or professional art | Advanced |
For most beginners, starting with a simple outline and gradually adding details provides the best results.
At a Glance
| Factor | Details |
| Flower Type | Tropical Flower |
| Petal Count | Usually Five |
| Main Feature | Long Stamen |
| Drawing Style | Sketch, Realistic, Cartoon |
| Recommended Medium | Pencil and Paper |
| Coloring Difficulty | Easy |
Things You’ll Need
| Item | Purpose |
| HB Pencil | Initial sketch |
| 2B or 4B Pencil | Shading |
| Eraser | Removing guidelines |
| Drawing Paper | Final artwork |
| Ruler (Optional) | Maintaining symmetry |
| Colored Pencils (Optional) | Coloring the flower |
| Reference Photo (Optional) | Improving accuracy |
Step-by-Step Guide
Step 1: Draw the Center Circle
Begin by lightly sketching a small circle near the center of your page.
This circle acts as the flower’s central point and helps position the petals correctly.
Keep the circle small because most of the flower’s size comes from the petals.
Common mistake: Making the center too large, which causes the flower to look disproportionate.
Step 2: Sketch Five Petal Guidelines
Draw five curved guideline shapes extending outward from the center.
Think of these as placeholders rather than final petals.
The petals should spread evenly around the center while slightly overlapping each other.
Don’t worry about perfection at this stage.
The purpose is to establish the flower’s overall shape and balance.
Step 3: Shape the First Petal
Choose one guideline and transform it into a natural hibiscus petal.
Hibiscus petals are broad, rounded, and slightly wavy along the edges.
Create soft curves rather than sharp angles.
A realistic hibiscus petal should appear delicate and flowing.
Step 4: Draw the Remaining Petals
Repeat the process for the other four petals.
Allow some petals to overlap slightly.
Natural flowers rarely appear perfectly symmetrical, so small variations actually improve realism.
Pay attention to:
- Petal width
- Curved edges
- Overlapping areas
- Natural flow
By the end of this step, the flower’s overall shape should be clearly recognizable.
Step 5: Add the Flower Tube
Hibiscus flowers have a distinctive central tube that extends outward.
Draw a narrow cylindrical shape emerging from the center of the flower.
This tube serves as the base for the stamen and is one of the most recognizable features of a hibiscus.
Avoid drawing it too thick.
A slender shape usually looks more realistic.
Step 6: Draw the Long Stamen
The stamen is the signature feature that makes a hibiscus instantly recognizable.
From the flower tube, draw a thin line extending outward. At the tip, add several small rounded circles or oval shapes to represent the pollen-bearing anthers. Near the base of the tip, draw five small rounded stigma pads.
Keep the stamen slightly curved rather than perfectly straight to give it a natural appearance.
Why it matters: A correctly shaped stamen immediately identifies the flower as a hibiscus.
Common mistake: Drawing the stamen too short or too thick.
Step 7: Refine the Petal Edges
Now go back over each petal.
Replace any rough guideline lines with smooth, flowing curves. Add subtle waves and tiny irregularities along the edges.
Real hibiscus petals are soft and organic, not perfectly smooth or geometric.
Erase any unnecessary construction lines once you’re satisfied with the shape.
Step 8: Add Petal Veins
Lightly sketch veins radiating from the center toward the outer edges of each petal.
Use thin, delicate lines.
The center vein should be slightly more visible than the smaller branching veins.
Don’t overdo the detail. The veins should enhance the drawing without becoming distracting.
Step 9: Add Leaves (Optional)
If you’d like a more complete botanical drawing, add one or two hibiscus leaves.
Hibiscus leaves are:
- Oval to heart-shaped
- Pointed at the tip
- Serrated around the edges
- Filled with visible branching veins
Place the leaves behind the flower so they don’t compete with the petals.
Step 10: Shade the Flower
Begin shading using a softer pencil such as a 2B or 4B.
Darken:
- The center of the flower
- Areas where petals overlap
- The underside of curled petal edges
- The flower tube
Leave highlights where light naturally hits the petals.
Gradually blend the shading to create a soft, realistic appearance.
Avoid pressing too hard early in the process. Building layers produces smoother results.
How to Know You Did It Correctly
A finished hibiscus drawing should have these characteristics:
- Five large, balanced petals
- A long, slender stamen extending outward
- Gentle, natural curves
- Visible but subtle petal veins
- Smooth shading with clear highlights
- Good overall symmetry without appearing overly perfect
If your flower looks slightly different from a reference photo, that’s perfectly normal. Natural hibiscus flowers vary in shape and size.
Expected Timeline and Results
| Experience Level | Estimated Time | Expected Result |
| Beginner | 30–45 minutes | Clean outline with basic shading |
| Intermediate | 20–30 minutes | Detailed, realistic flower |
| Advanced | 15–25 minutes | Highly polished botanical illustration |
With regular practice, you’ll become faster and more confident while improving your understanding of flower structure.
Common Mistakes to Avoid
- Drawing petals with perfectly straight edges
- Making every petal identical
- Forgetting the long hibiscus stamen
- Using dark outlines too early
- Adding veins that are too thick
- Pressing too hard during the initial sketch
- Ignoring petal overlap, making the flower look flat
- Over-shading and losing the natural softness of the petals
Troubleshooting & Common Problems
| Problem | Cause | Solution |
| Flower looks flat | Little or no shading | Add shadows beneath overlapping petals |
| Petals look stiff | Straight edges | Use smoother, flowing curves |
| Flower looks uneven | Poor initial guidelines | Start with evenly spaced construction lines |
| Stamen looks unrealistic | Too short or thick | Make it longer and thinner with rounded tips |
| Drawing appears messy | Dark sketch lines | Use light guidelines and erase them before finishing |
| Petals look identical | Copying the same shape repeatedly | Slightly vary the size and curves of each petal |
Expert Tips
- Start with very light pencil pressure so corrections are easy.
- Study real hibiscus photos instead of relying only on other drawings.
- Rotate your paper while drawing curved petals for smoother lines.
- Shade from the flower’s center outward to create natural depth.
- Leave small white highlights to make the petals appear silky.
- Practice individual petals before drawing the complete flower.
- Compare your sketch with a reference after every major step instead of waiting until the end.
What to Do Next
Now that you’ve learned how to draw a hibiscus flower, build your skills by practicing different styles and angles.
Try these next steps:
- Draw the flower from a side view.
- Practice sketching partially opened hibiscus buds.
- Experiment with colored pencils, watercolor, or markers.
- Draw multiple hibiscus flowers to create a tropical bouquet.
- Add leaves, stems, and a simple background for a complete botanical illustration.
- Challenge yourself to draw a hibiscus without using a reference image after a few practice sessions.
The more flowers you draw, the more naturally you’ll understand petal shapes, proportions, and shading.
FAQs
Can beginners draw a hibiscus flower?
Yes. A hibiscus flower is beginner-friendly because it has only five large petals and a simple overall structure. Starting with basic guidelines makes it much easier.
What is the easiest way to draw a hibiscus flower?
The easiest method is to sketch a small center circle, add five petal guidelines, refine each petal, draw the long stamen, and finish with light shading.
How many petals does a hibiscus flower have?
Most hibiscus flowers have five large petals, although some cultivated varieties may have additional petals.
What pencil is best for drawing flowers?
An HB pencil works well for sketching, while 2B or 4B pencils are excellent for adding shading and depth.
How can I make my hibiscus drawing look realistic?
Focus on soft, curved petal edges, subtle veins, smooth shading, and realistic highlights. Studying a real hibiscus reference photo also helps improve accuracy.
Should I draw the petals before the stamen?
Yes. Drawing the petals first establishes the flower’s overall shape, making it easier to position the stamen correctly.
Can I color my hibiscus drawing?
Absolutely. Hibiscus flowers come in many colors, including red, pink, yellow, orange, white, and purple. Colored pencils, markers, or watercolor paints all work well.
Why does my flower look flat?
Flat drawings usually lack shading or overlapping petals. Add darker shadows near the flower’s center and where petals overlap to create depth.
Final Thoughts
Learning how to draw a hibiscus flower doesn’t require advanced artistic skills just patience and a step-by-step approach. By starting with simple construction lines, refining each petal gradually, and adding realistic shading, you can create a beautiful tropical flower that looks balanced and natural.
One technique many tutorials overlook is checking your flower’s silhouette before adding details. After sketching the petals, briefly view your drawing from a distance or in a mirror. If the overall outline looks balanced, the finished drawing will usually look much more realistic. Making this quick check before shading can save time and reduce major corrections later.
Keep practicing with different flower sizes, angles, and coloring techniques. As your confidence grows, you’ll find it easier to draw other tropical flowers and create more detailed botanical artwork.
