
Smoked chicken wings combine rich smoky flavor with juicy meat and crispy skin, making them one of the most satisfying foods you can cook on a smoker. Whether you’re hosting a backyard barbecue, preparing game-day snacks, or simply trying something different from grilled or fried wings, learning how to smoke wings is a skill worth mastering.
The biggest challenge isn’t cooking the meat; it’s getting the skin crispy without drying out the chicken. Many recipes overlook this step, leaving readers with rubbery skin despite perfectly cooked meat. This guide covers the entire process, from selecting the right wings and wood to finishing them for the perfect bite.
By the end of this guide, you’ll know exactly how to smoke wings that are flavorful, tender, and beautifully crisp.
Featured Snippet
To smoke wings, season the chicken, preheat your smoker to 250–275°F, and cook the wings for about 1½–2 hours until they reach an internal temperature of 165°F. For crispy skin, increase the smoker to high heat or finish the wings on a hot grill or under a broiler for a few minutes before serving.
Before You Begin
Smoking chicken wings is beginner-friendly, but a little preparation makes a big difference.
| Factor | Details |
| Difficulty | Easy |
| Total Time | 2–2½ hours |
| Active Time | 20–30 minutes |
| Estimated Cost | Low to Moderate |
| Skill Level | Beginner to Intermediate |
| Best For | BBQs, parties, family dinners, meal prep |
DIY or Buy?
Smoking wings at home offers complete control over flavor, seasoning, wood type, and doneness. Store-bought smoked wings are convenient but often lack fresh smoky flavor and crisp skin.
Prerequisites
Before starting, make sure you have:
- A smoker or pellet grill
- Chicken wings (whole or separated)
- Meat thermometer
- Dry seasoning or BBQ rub
- Paper towels
- Wood pellets or smoking wood
- Cooking oil (optional for crispier skin)
Choosing the Right Approach
Different smoking temperatures produce different results. Choosing the right method depends on whether you value maximum smoke flavor or crispy skin.
| Method | Best For | Pros | Cons |
| Low & Slow (225–250°F) | Deep smoky flavor | Rich smoke taste, juicy meat | Skin may stay soft unless finished at high heat |
| Medium Heat (250–275°F) | Best overall balance | Good smoke flavor with better skin texture | Slightly less smoky |
| Hot & Fast (300–325°F) | Crispy skin | Crispy exterior, faster cooking | Lighter smoke flavor |
Which Method Is Best?
For most home cooks, 250–275°F is the sweet spot. It gives the wings enough time to absorb smoke while reducing the chance of rubbery skin.
Pro Tip: One detail many recipes skip is drying the wings thoroughly before seasoning. Removing excess moisture helps the skin render properly, leading to a much crispier finish.
At a Glance
| Category | Information |
| Cooking Method | Smoking |
| Cooking Temperature | 250–275°F |
| Internal Temperature | 165°F minimum |
| Best Wood | Apple, Cherry, Hickory, Pecan |
| Smoke Flavor | Mild to Medium |
| Preparation Time | 15 minutes |
| Smoking Time | 1½–2 hours |
| Finish | High heat for crispy skin |
Things You’ll Need
| Item | Purpose |
| Chicken wings | Main ingredient |
| Smoker or pellet grill | Cooking |
| Wood pellets or chunks | Smoke flavor |
| Paper towels | Drying the wings |
| Dry rub | Seasoning |
| Olive oil (optional) | Helps seasoning stick |
| Meat thermometer | Accurate doneness |
| Tongs | Safe handling |
| Wire rack | Air circulation during prep |
| BBQ sauce (optional) | Toss after smoking |
Safety Precautions
Working with raw poultry and high cooking temperatures requires a few basic precautions.
- Wash your hands before and after handling raw chicken.
- Use separate cutting boards for raw meat and ready-to-eat foods.
- Never place cooked wings back on the same plate that held raw chicken.
- Always verify doneness with a meat thermometer instead of relying on appearance.
- Keep the smoker on a stable, non-flammable surface.
- Wear heat-resistant gloves when adjusting vents or moving hot grates.
- Allow the smoker to cool completely before cleaning.
Step-by-Step Guide
Step 1: Choose Quality Chicken Wings
Fresh wings generally provide better texture than previously frozen wings, although frozen wings work well if fully thawed.
You can buy:
- Whole wings
- Party wings (drumettes and flats)
- Drumettes only
- Flats only
If using whole wings, separate them at the joints for more even cooking.
Why it matters: Uniform-sized pieces cook more evenly.
Common mistake: Mixing very large and very small wings causes uneven cooking.
Step 2: Dry the Wings Thoroughly
Pat every wing completely dry using paper towels.
Moisture is the biggest enemy of crispy skin. The drier the surface, the better the skin will render during smoking.
For even better results, place the wings uncovered on a wire rack in the refrigerator for 2–8 hours before smoking. This air-dries the skin and noticeably improves crispness.
Why it matters: Dry skin browns faster and develops a better texture.
Common mistake: Seasoning wet wings immediately after removing them from the package.
Step 3: Season the Wings
Lightly coat the wings with oil if desired, then apply your favorite BBQ dry rub evenly.
A balanced rub typically includes:
- Kosher salt
- Black pepper
- Paprika
- Garlic powder
- Onion powder
- Brown sugar (optional)
- Cayenne pepper (optional)
Make sure every wing is coated evenly without piling on excessive seasoning.
Why it matters: Even seasoning creates consistent flavor in every bite.
Common mistake: Applying too much sugar-heavy rub, which can darken too quickly during higher-temperature finishing.
Step 4: Preheat the Smoker
Preheat your smoker to 250–275°F before adding the wings.
Choose a wood that complements chicken rather than overpowering it.
Recommended woods include:
- Apple
- Cherry
- Pecan
- Hickory
- Maple
Fruit woods provide a lighter smoke, while hickory delivers a stronger BBQ flavor.
Wait until the smoker has reached a stable temperature before placing the wings inside.
Why it matters: Stable heat ensures even cooking from the beginning.
Common mistake: Adding food before the smoker reaches the target temperature.
Step 5: Smoke the Wings
Arrange the wings in a single layer with a small gap between each piece.
Avoid overcrowding, as proper airflow is essential for even cooking and smoke circulation.
Close the lid and allow the wings to smoke for approximately 60–90 minutes, checking occasionally to ensure the smoker maintains a steady temperature.
Resist opening the lid too often. Every time the lid opens, heat and smoke escape, increasing cooking time.
After about an hour, begin checking the internal temperature with a meat thermometer.
The wings are ready for the finishing stage once they approach 160–165°F.
Why it matters: Consistent airflow and stable temperatures produce evenly cooked wings with better smoke flavor.
Common mistake: Constantly opening the smoker to check the food, which slows cooking and reduces smoke absorption.
Step 6: Crisp the Skin
One of the biggest complaints about smoked wings is rubbery skin. Fortunately, it’s easy to avoid.
Once the wings reach about 160–165°F, finish them using one of these methods:
| Method | Time | Best For |
| Increase smoker to 375–400°F | 8–12 minutes | Pellet smokers |
| Finish on a hot gas or charcoal grill | 3–5 minutes per side | Crispiest skin |
| Broil in the oven | 2–4 minutes | Indoor finishing |
Watch closely during this step because the skin can brown quickly.
Why it matters: High heat renders the remaining fat under the skin, creating a crisp exterior without drying the meat.
Common mistake: Leaving wings at low smoking temperatures for the entire cook, resulting in chewy skin.
Step 7: Sauce (Optional)
If you prefer sauced wings, wait until after the skin has crisped.
Popular options include:
- Buffalo sauce
- Honey BBQ
- Garlic Parmesan
- Sweet chili
- Lemon pepper butter
- Teriyaki
- Nashville hot
Place the wings in a large bowl, add a small amount of sauce, and toss until evenly coated.
For sticky BBQ wings, return them to the smoker or grill for 3–5 minutes to help the sauce set.
Why it matters: Applying sauce too early can burn the sugars before the wings are fully cooked.
Common mistake: Drenching the wings in sauce, which softens the crispy skin.
Step 8: Rest and Serve
Allow the wings to rest for 5–10 minutes before serving.
Resting lets the juices redistribute throughout the meat, keeping every bite moist.
Serve with:
- Ranch dressing
- Blue cheese dressing
- Celery sticks
- Carrot sticks
- Coleslaw
- Potato salad
- Smoked mac and cheese
- Cornbread
How to Know You Did It Correctly
Your smoked wings should have:
- ✔ Internal temperature of 165°F or higher
- ✔ Golden brown or mahogany-colored skin
- ✔ Visible smoky aroma
- ✔ Juicy meat that pulls easily from the bone
- ✔ Crispy or lightly crisp skin
- ✔ Even seasoning on every piece
- ✔ No pink meat near the bone
If the skin is chewy but the meat is fully cooked, simply finish the wings over higher heat for a few more minutes.
Expected Timeline and Results
| Stage | Approximate Time |
| Prep | 15–20 minutes |
| Optional Air Dry | 2–8 hours |
| Preheat Smoker | 15–20 minutes |
| Smoke | 60–90 minutes |
| Crisp Skin | 8–12 minutes |
| Rest | 5–10 minutes |
| Total Active Cook Time | About 2 hours |
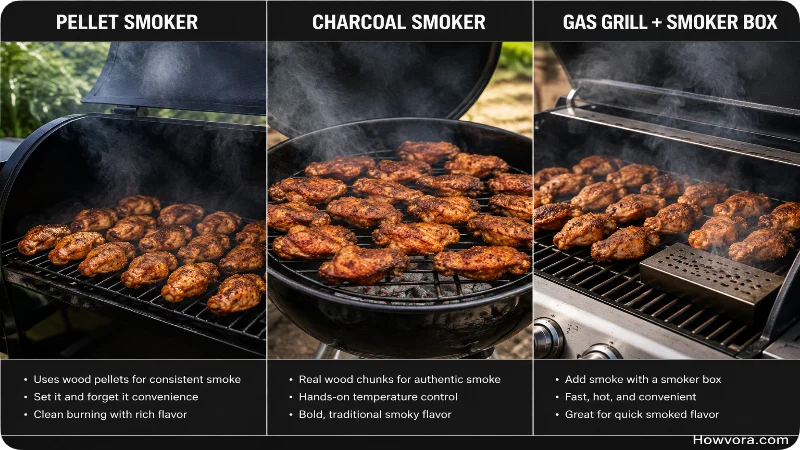
Alternative Methods
If you don’t own a smoker, you still have options.
Pellet Grill
Pellet grills are one of the easiest ways to smoke wings because they automatically regulate temperature.
Charcoal Grill
Arrange charcoal for indirect cooking and add wood chunks to produce smoke.
Electric Smoker
Produces consistent temperatures with minimal effort but typically creates a lighter smoke flavor.
Gas Grill
Use a smoker box filled with wood chips and cook the wings over indirect heat.
Oven + Liquid Smoke
While it won’t perfectly replicate a smoker, adding a small amount of liquid smoke to the seasoning and finishing under the broiler can provide a similar flavor profile.
Common Mistakes to Avoid
- Skipping the drying step.
- Smoking at temperatures that are too low for the entire cook.
- Using too much strong wood like mesquite.
- Not preheating the smoker.
- Overcrowding the cooking grate.
- Guessing doneness without a thermometer.
- Applying sugary sauce too early.
- Opening the smoker every few minutes.
- Removing wings before they reach 165°F.
- Forgetting to finish over high heat for crispy skin.
Troubleshooting & Common Problems
| Problem | Cause | Solution |
| Rubbery skin | Temperature too low | Finish over high heat or broil |
| Dry meat | Overcooked | Remove at 165°F and monitor with a thermometer |
| Weak smoke flavor | Mild wood or short cook | Use hickory or pecan and maintain steady smoke |
| Bitter flavor | Too much heavy smoke | Burn clean, thin blue smoke instead of thick white smoke |
| Uneven cooking | Wings touching each other | Leave space between each wing |
| Burned sauce | Sauced too early | Sauce only during the final few minutes |
| Pale color | Low heat throughout | Finish with higher heat |
| Wings sticking | Dirty or dry grate | Oil or clean the cooking grate before cooking |
Expert Tips
- Air-dry the wings overnight in the refrigerator for exceptionally crispy skin.
- Mix apple and hickory wood for a balanced smoke flavor.
- Flip the wings only once if needed; excessive handling slows browning.
- Season under the wings as well as on top for even flavor.
- Cook by internal temperature, not by the clock.
- If serving a crowd, smoke the wings ahead of time and crisp them just before serving.
- Avoid thick layers of sauce—light coatings preserve crispness.
- For extra flavor, let the dry rub sit on the wings for 30–60 minutes before smoking.
When to Call a Professional
Smoking chicken wings is a DIY-friendly cooking project, so there’s generally no need to hire a professional.
However, if you’re planning food for a large event, wedding, corporate gathering, or festival, a professional BBQ caterer can handle larger quantities while maintaining consistent quality.
What to Do Next
Now that you know how to smoke wings successfully:
- Experiment with different wood combinations.
- Try homemade dry rubs.
- Test new sauces after smoking.
- Practice cooking at different temperatures to find your preferred texture.
- Pair smoked wings with classic BBQ side dishes for a complete meal.
The more you practice, the easier it becomes to produce consistently juicy, smoky, and crispy wings.
FAQs
How long does it take to smoke wings?
Most chicken wings take 1½ to 2 hours at 250–275°F, plus a few minutes of high heat for crispy skin.
What is the best wood for smoking wings?
Apple, cherry, pecan, and hickory are all excellent choices. Fruit woods provide a milder flavor, while hickory offers a stronger traditional BBQ taste.
Should I flip smoked wings?
Flipping once during cooking is optional. Many smokers circulate heat evenly enough that frequent flipping isn’t necessary.
Why are my smoked wings rubbery?
Rubbery skin is usually caused by cooking at low temperatures for too long without a high-heat finish.
Can I smoke frozen wings?
It’s best to thaw wings completely before smoking. Thawed wings cook more evenly and absorb seasoning and smoke better.
Should I sauce wings before smoking?
No. Apply sauce after the wings have nearly finished cooking to prevent burning and preserve crisp skin.
Can I prepare smoked wings in advance?
Yes. Smoke them until cooked, refrigerate, then crisp them on a grill or in the oven just before serving.
What internal temperature should smoked wings reach?
Chicken wings are safe to eat once the thickest part reaches 165°F.
Final Thoughts
Learning how to smoke wings isn’t difficult, but a few small techniques make a huge difference. Drying the wings before seasoning, maintaining a steady smoker temperature, checking doneness with a thermometer, and finishing over high heat are the keys to juicy meat and crispy skin.
Whether you enjoy classic BBQ seasoning, spicy Buffalo sauce, or garlic Parmesan, smoked wings provide a flavorful foundation for countless variations. Once you’ve mastered the basics, you can experiment with different woods, rubs, and sauces to create your own signature recipe.
