
Fresh corn on the cob is one of the easiest and most satisfying side dishes you can make, but boiling a large pot of water isn’t always convenient. If you’re looking for a quicker method that delivers sweet, tender kernels with minimal cleanup, learning how to cook corn on the cob in a microwave is the perfect solution.
Microwaving corn helps preserve its natural moisture, resulting in juicy, flavorful kernels without drying them out. If you’re preparing one ear for a quick lunch or several for a family dinner, this method is simple, beginner-friendly, and takes just a few minutes.
In this guide, you’ll learn the best microwave techniques, recommended cooking times, how to tell when your corn is perfectly cooked, and tips for getting delicious results every time.
Featured Snippet
To cook corn on the cob in the microwave, place one or two ears of corn in the microwave with the husk on or wrapped in a damp paper towel if husked. Microwave on High for 3–5 minutes per ear, depending on size and your microwave’s power. Let the corn rest for 2 minutes before carefully removing the husk or towel, then season and serve.
Before You Begin
Microwaving corn is one of the easiest cooking methods available, but a few small details can make a noticeable difference in the final texture and flavor.
Difficulty
Easy, suitable for complete beginners.
Time Required
- Prep Time: 2 minutes
- Cook Time: 3–8 minutes
- Rest Time: 2 minutes
- Total Time: Approximately 7–12 minutes
Estimated Cost
Usually under $1–$3, depending on how many ears of fresh corn you’re cooking.
DIY or Professional?
Completely DIY. No special kitchen skills or equipment are needed beyond a microwave.
Before You Start
For the best results:
- Choose fresh ears with bright green husks.
- Avoid ears with dry, brown husks or shriveled kernels.
- Trim excessively long stems if they don’t fit inside your microwave.
- Wash the outside if the corn has dirt on the husk.
- Use microwave-safe plates or containers only.
Choosing the Right Approach
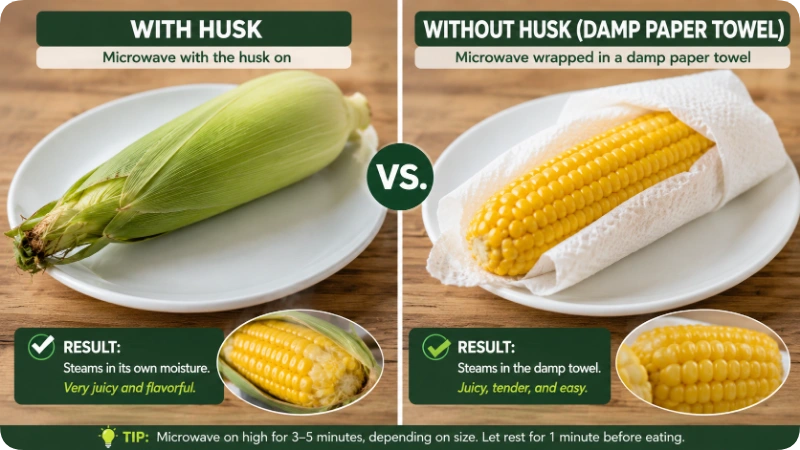
There are several ways to microwave corn, and each has its advantages.
| Method | Best For | Pros | Cons |
| Cooking with the husk on | Fresh corn | Keeps kernels moist, easier peeling after cooking | Takes slightly longer |
| Husk removed, wrapped in damp paper towel | Quick cooking | Great when husks are already removed | Can dry slightly if overcooked |
| Husk removed in microwave-safe dish with lid | Multiple ears | Even cooking and easy cleanup | Requires suitable container |
| Plastic wrap method (vented) | Not generally recommended | Retains moisture | Less environmentally friendly and unnecessary when paper towels work well |
Best Overall Choice: Cooking corn with the husk on provides the juiciest results because the husk naturally traps steam around the kernels during cooking.
At a Glance
| Factor | Details |
| Difficulty | Easy |
| Total Time | 7–12 minutes |
| Cost | Low |
| Skill Level | Beginner |
| Best For | Quick side dishes, small meals, busy weeknights |
| Equipment Needed | Microwave and microwave-safe plate |
Things You’ll Need
| Item | Purpose |
| Fresh corn on the cob | Main ingredient |
| Microwave | Cooking |
| Microwave-safe plate | Holds the corn safely |
| Kitchen towel or oven mitts | Protect hands from steam |
| Damp paper towel (if husked) | Prevents drying out |
| Butter (optional) | Adds richness |
| Salt and pepper | Basic seasoning |
| Optional toppings | Parmesan, herbs, chili powder, garlic butter, lime juice, paprika |
Step-by-Step Guide
Step 1: Decide if to Leave the Husk On
The first decision is whether to cook the corn with or without the husk.
- Husk on: Best for fresh corn because it traps steam naturally, keeping the kernels juicy and making the silk easier to remove afterward.
- Husk removed: Works well if the corn has already been cleaned. Wrap it in a damp paper towel to prevent it from drying out.
Why it matters: The husk acts like a natural steamer, helping the corn cook evenly without losing moisture.
Common mistake: Removing the husk and microwaving the corn uncovered. This often results in dry or chewy kernels.
Step 2: Prepare the Corn
If you’re cooking with the husk on:
- Remove only the loose outer leaves.
- Trim the stem if necessary, so the ear fits comfortably inside the microwave.
- Leave the remaining husk and silk intact.
If you’re cooking without the husk:
- Remove all husks and silk.
- Wrap each ear in a damp paper towel.
- Place it on a microwave-safe plate.
Avoid adding water. The corn contains enough natural moisture to create steam during cooking.
Step 3: Arrange the Corn Properly
Place the corn in a single layer on a microwave-safe plate.
- Leave a little space between multiple ears.
- Avoid stacking them on top of each other.
- Position thicker ends toward the outside if your microwave has hot spots.
Proper spacing allows the microwave energy to cook each ear more evenly.
Step 4: Microwave Using the Correct Cooking Time
Microwave ovens vary in power, so the exact cooking time may differ slightly.
| Number of Ears | Cooking Time (High Power) |
| 1 ear | 3–4 minutes |
| 2 ears | 5–6 minutes |
| 3 ears | 7–9 minutes |
| 4 ears | 9–12 minutes |
For very large ears, add about 30–60 seconds if needed.
If your microwave is lower than 1,000 watts, you may need slightly longer cooking times.
Tip: It’s easier to add another 30 seconds than to fix overcooked corn.
Step 5: Let the Corn Rest
After the microwave stops, resist the temptation to peel the corn immediately.
Let it rest for 2 minutes.
During this time:
- The trapped steam finishes cooking the kernels.
- The heat distributes more evenly.
- The corn becomes easier to handle safely.
This short resting period makes a noticeable difference in texture.
Step 6: Remove the Husk Carefully
The corn and the steam inside will be very hot.
If cooked with the husk on:
- Hold the ear with an oven mitt or kitchen towel.
- Cut about ½ inch from the stem end (optional but helpful).
- Grip the top of the husk and gently squeeze or pull the corn out.
In many cases, the silk slides off with the husk, making cleanup much easier.
If cooked without the husk:
Simply remove the damp paper towel carefully, watching out for hot steam.
Common mistake: Peeling the husk with bare hands immediately after microwaving, which can cause steam burns.
Step 7: Check for Doneness
Perfectly cooked corn should have:
- Bright yellow or golden kernels
- A plump, glossy appearance
- Tender but slightly crisp texture
- Sweet aroma
- Easy-to-bite kernels without being mushy
If the kernels still seem firm, microwave the corn in 30-second intervals until done.
Avoid adding several extra minutes at once, as overcooked corn quickly becomes chewy.
Step 8: Season and Serve
Microwaved corn is delicious on its own, but a few simple toppings can make it even better.
Classic options include:
- Butter
- Salt
- Black pepper
For extra flavor, try:
- Garlic butter
- Parmesan cheese
- Chili powder
- Smoked paprika
- Fresh parsley
- Cilantro
- Lime juice
- Everything bagel seasoning
- Cajun seasoning
- Herb butter
If serving at a barbecue, pair the corn with grilled chicken, burgers, steaks, pulled pork, or fresh summer salads.
Step 9: Store Leftovers Properly
If you have leftover corn:
- Let it cool completely.
- Store it in an airtight container or wrap each ear tightly.
- Refrigerate for up to 3–4 days.
To reheat:
- Wrap the corn in a damp paper towel.
- Microwave for 30–60 seconds until heated through.
You can also cut the kernels off the cob and add them to:
- Salads
- Soups
- Tacos
- Fried rice
- Pasta dishes
- Corn salsa
- Casseroles
Proper storage helps maintain the corn’s sweetness and texture.
How to Know You Did It Correctly
Perfect microwaved corn should be tender, juicy, and naturally sweet without becoming mushy. Use these signs to check if it’s cooked just right.
Signs of Perfectly Cooked Corn
- 🌽 Kernels look bright yellow or golden.
- 🌽 The kernels are plump and glossy.
- 🌽 A fork easily pierces the kernels.
- 🌽 The corn smells fresh and sweet.
- 🌽 The kernels are tender with a slight bite, not hard or chewy.
- 🌽 Butter melts quickly over the hot surface.
If your corn still feels firm or starchy, microwave it for another 30 seconds, then check again.
Expected Timeline and Results
| Stage | Time |
| Prepare the corn | 2 minutes |
| Microwave cooking | 3–12 minutes |
| Rest after cooking | 2 minutes |
| Season and serve | 1 minute |
| Total Time | 7–15 minutes |
What You Can Expect
When cooked correctly, microwave corn should have:
- Juicy, tender kernels
- Natural sweetness
- Even cooking from end to end
- Minimal cleanup
- No large pot of boiling water needed
Common Mistakes to Avoid
Even though microwaving corn is simple, these mistakes can affect the final result.
1. Overcooking the Corn
Cooking too long removes moisture and makes the kernels chewy.
Instead: Start with the recommended cooking time and add only 30-second increments if needed.
2. Microwaving Husked Corn Without Moisture
Corn without the husk can dry out quickly.
Instead: Wrap it in a damp paper towel before microwaving.
3. Skipping the Rest Time
Removing the corn immediately after cooking stops the steaming process too soon.
Instead: Let it rest for about two minutes.
4. Forgetting About Steam
The steam trapped inside the husk is extremely hot.
Instead: Use oven mitts or a clean kitchen towel when handling the corn.
5. Cooking Too Many Ears Together
Crowding the microwave causes uneven cooking.
Instead: Arrange the ears in a single layer with a little space between them.
6. Using Old Corn
Older corn loses moisture and sweetness.
Look for:
- Bright green husks
- Moist silk
- Firm kernels
- Fresh smell
Fresh corn consistently produces the best results.
Troubleshooting & Common Problems
| Problem | Likely Cause | Solution |
| Corn is still hard | Not cooked long enough | Microwave for another 30–60 seconds |
| Corn is chewy | Overcooked | Reduce cooking time next time |
| Some kernels are hot while others are cool | Uneven placement | Rotate the corn halfway through cooking |
| Corn seems dry | Husk removed without moisture | Wrap in a damp paper towel before microwaving |
| Husk is difficult to remove | Corn hasn’t rested | Wait another minute before peeling |
| Silk sticks to the kernels | Corn wasn’t cooked in the husk | Rinse lightly or remove silk before cooking |
Expert Tips
These simple tricks can make microwave corn taste even better.
Cook with the Husk Whenever Possible
The husk naturally traps steam, keeping the kernels juicy while making silk removal much easier.
Rotate Large Ears Halfway
If your microwave doesn’t have a turntable, rotate the corn halfway through cooking for more even heating.
Add Butter After Cooking
Butter melts best on freshly cooked corn. Adding it before microwaving isn’t necessary because the natural steam already keeps the kernels moist.
Season Beyond Salt
Try different flavor combinations such as:
- Garlic butter and parsley
- Parmesan with black pepper
- Chili powder and lime
- Cajun seasoning
- Smoked paprika and butter
- Ranch seasoning
- Everything bagel seasoning
Don’t Overcook Sweet Corn
Fresh summer sweet corn cooks very quickly. Start with the lower end of the recommended cooking time and add more only if needed.
Test One Ear First
If you’re unsure about your microwave’s power, cook one ear first. Once you know the ideal time, it’s easy to repeat for additional ears.
What to Do Next
Now that you know how to cook corn on the cob in a microwave, you can easily make it part of quick lunches, weeknight dinners, or backyard barbecues. The method is fast, requires very little cleanup, and works well if you’re cooking one ear or several.
Here are a few ideas to enjoy your freshly cooked corn:
- Slice the kernels into tacos or burrito bowls.
- Add them to salads for extra sweetness and crunch.
- Mix them into soups or chowders.
- Stir the kernels into fried rice or pasta.
- Serve alongside grilled chicken, steak, burgers, or BBQ ribs.
- Brush with garlic butter, herb butter, or spicy mayo for extra flavor.
If you often buy fresh corn during the summer, mastering this microwave method can save time while delivering consistently delicious results.
Frequently Asked Questions
Can you microwave corn on the cob with the husk on?
Yes. Cooking corn with the husk on is one of the best methods because the husk traps steam, helping the kernels stay moist and making the silk much easier to remove after cooking.
How long does it take to microwave one ear of corn?
One medium ear typically takes 3 to 4 minutes on High. Larger ears or lower-powered microwaves may require an additional 30–60 seconds.
Is it better to microwave corn with or without the husk?
Cooking with the husk generally produces juicier corn because it acts as a natural steamer. If the husk has already been removed, wrapping the corn in a damp paper towel helps retain moisture.
Can you microwave multiple ears at the same time?
Yes. Increase the cooking time based on the number of ears and arrange them in a single layer so they cook evenly. Avoid stacking them on top of each other.
Should I add water before microwaving corn?
No. Fresh corn contains enough natural moisture to create steam during cooking. Adding water isn’t necessary.
Can frozen corn on the cob be microwaved?
Yes. Follow the package instructions if available. If not, microwave frozen ears for approximately 5–7 minutes, turning them halfway through cooking. The exact time depends on your microwave’s wattage and the size of the corn.
Why is my microwaved corn chewy?
Chewy corn is usually a sign of overcooking. Reduce the cooking time next time and heat in 30-second increments until the kernels are just tender.
How do I store leftover corn on the cob?
Allow the corn to cool completely, then refrigerate it in an airtight container for up to 4 days. Reheat it in the microwave wrapped in a damp paper towel for about 30–60 seconds.
Final Thoughts
Learning how to cook corn on the cob in a microwave is one of the quickest ways to enjoy fresh, sweet corn without boiling water or heating the kitchen. In just a few minutes, you can have tender, juicy corn that’s ready for butter, herbs, spices, or your favorite toppings.
For the best results, cook fresh corn with the husk on whenever possible, let it rest for a couple of minutes after microwaving, and avoid overcooking. Small adjustments in cooking time can make a big difference, especially since microwave power varies.
If you’re preparing a single serving or making a quick side dish for dinner, this simple method delivers reliable results with minimal effort and cleanup.
